PNMC Tracker Getting Started
The purpose of this user guide is to give an overview of the Compensation Tracker and its functions.
After reviewing this user guide, you will be able to perform several tasks:
- Navigate the Compensation Tracker.
Understand the functions available in the Compensation Tracker.
To begin using the Non-Monetary Compensation Tracker, first you need to login to Join the Endeavor:
- Open your Internet browser.
- Copy and paste this link http://www.jointheendeavor.com/login into your browser.
- On the login screen, type in your user name and password.
If you don’t have a username and password, contact your company’s product administrator
Before you start using the Physician Non-Monetary Compensation Tracker, we recommend that you first complete the training courses. Our online training videos and user guides will walk you through the information you need to get started using all the features that the Physician Non-Monetary Compensation Tracker has to offer.
By following the Instructions provided in the Physician Non-Monetary Compensation Tracker User Guide, you will be able to monitor compensation limits by physician and organization.
I. Getting Started with Physician Non-Monetary Compensation Tracker
- Physician Non-Monetary Compensation Tracker Quick Guide/Overview
II. Physician Non-Monetary Compensation Tracker Setup
- Add Entity
- Add Submitter
- Add Physician
- Product Settings
- Email Alert Settings
- Add Record/File Import
III. Compensation Reports and Chart Data
- Compensation Reports
- View Chart Data
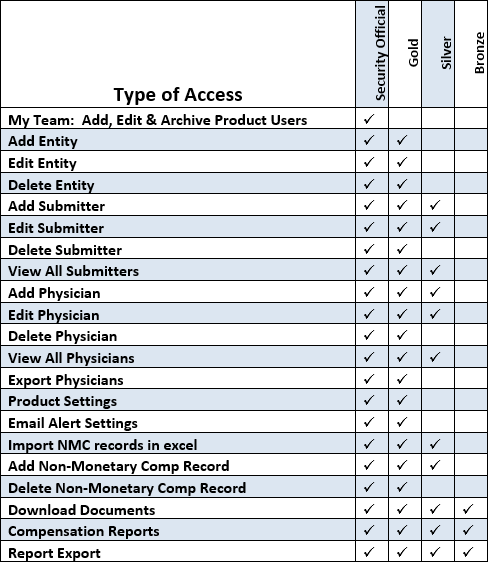
Included below is a list of user roles based on level of access and available functions in the Physician Non-Monetary Compensation Tracker.
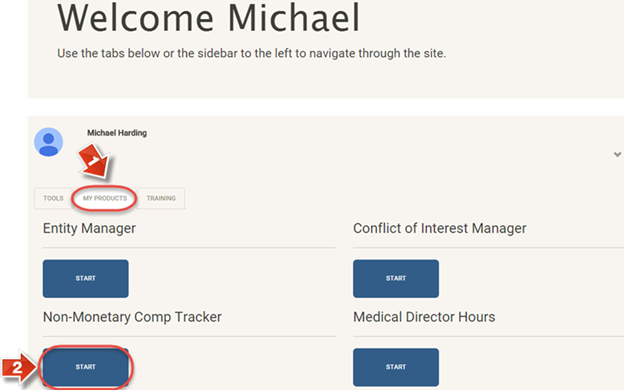
When you log in, on the Join the Endeavor Homepage go to the “My Products” tab (1) and access the “Physician Non-Monetary Compensation Tracker” (2).
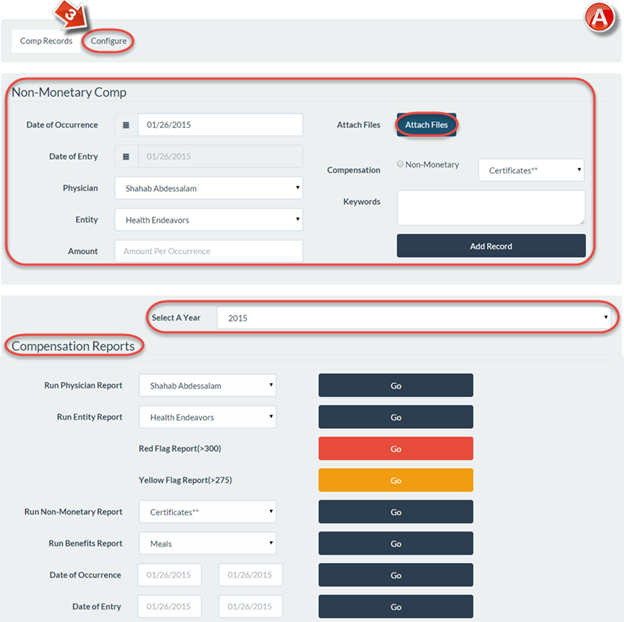
The “Comp Records” page (A) is the main page of the Physician Non-Monetary Compensation Tracker. It is possible to add a non-monetary compensation record. Reports are available further down in the section titled “Compensation Reports”. New data fields can be created by clicking the “Configure” button (3). Not all users will have access to the “Configure” tab.
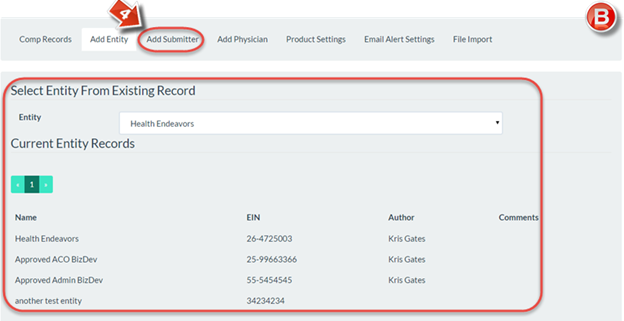
Clicking the “Configure” button opens the “Add Entity” page (B), where new entities can be added to the Tracker.
In addition, clicking “Configure” opens up all available configuration options. The next tab leads to the “Add Submitter” page (4).
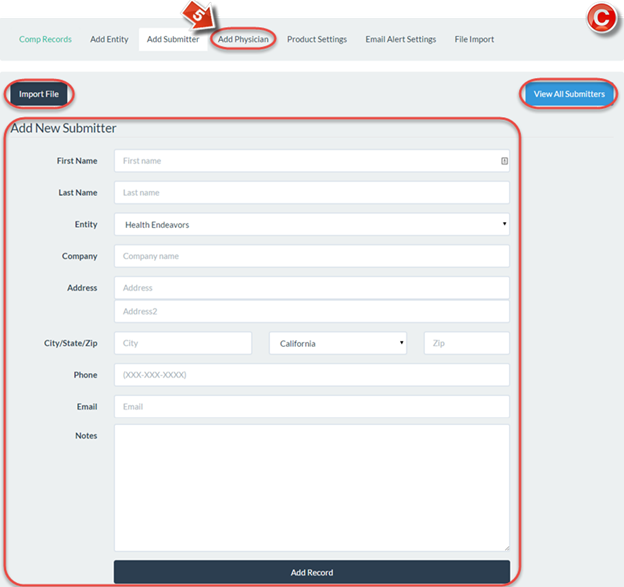
The “Add Submitter” page (C) allows the addition of users who can approve or deny non-monetary compensation record additions. Clicking “Import File” will allow multiple submitters to be added at once. It is possible to view existing submitters by clicking the “View All Submitters” button. The next tab leads to the “Add Physician” (5) page.
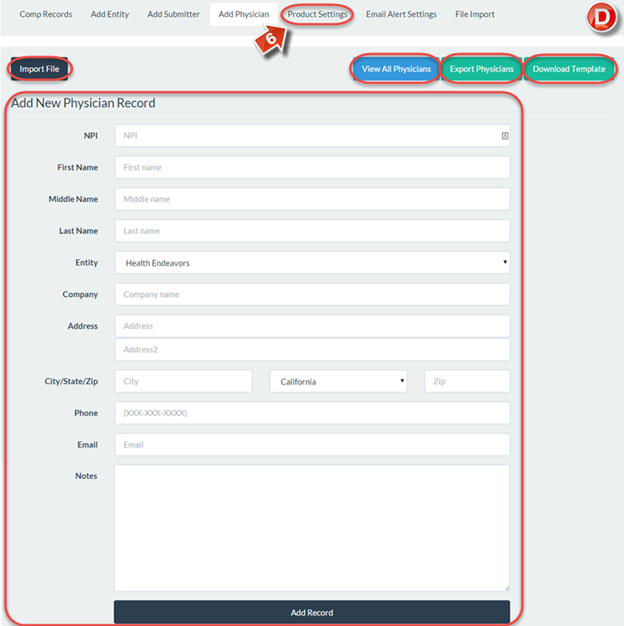
The “Add Physician” page (D) allows the adding of physicians to the non-monetary compensation tracking system. To view existing entries, click the “View All Physicians” button. The “Export Physicians” button will also do this, and open the list in Excel. Clicking “Download Template” will download a spreadsheet that can be uploaded with the “Import File” button for adding multiple physicians. The next tab leads to the “Product Settings” page (6).
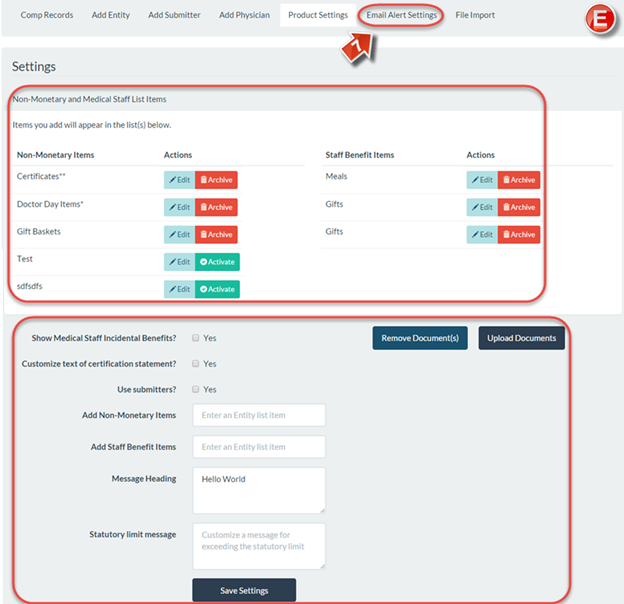
The “Product Settings” page (E) contains several options for use in the Tracker. It is possible to activate or archive both Non-Monetary and Staff Benefit Items. Below these Items are several more options, including the ability to upload documents related to Tracker company policy, law documents, or anything else a submitter should read before filling out the submitter form. The next tab leads to the “Email Alert Settings” page (7).
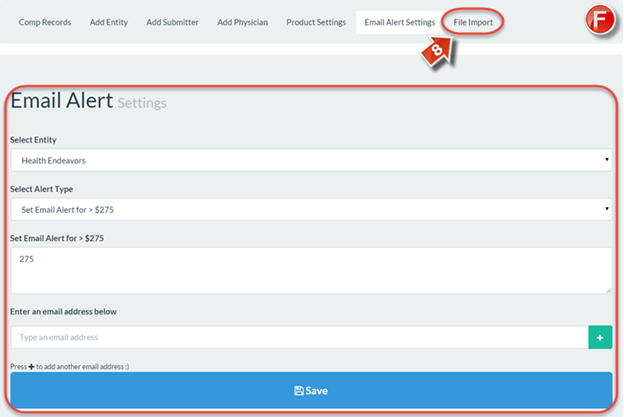
The “Email Alert Settings” page (F) contains E-mail notification information. Sorted by Entity and Alert Type, this will send an E-mail to the chosen E-mail address when the criteria for the message has been met. For example, if the total compensation amount exceeds part or all of the limit, an E-mail could be sent to notify an administrator of the occurrence. The next tab leads to the “File Import” page (8).
The “File Import” page (G) allows an authorized submitter to add multiple records to the Tracker at once. After using the “Click Here” link, a spreadsheet can be created and then submitted using the “Import File” button for multiple record uploads.
