Run a COI Status Report
Use the processes outlined in this section to search for participants on the Status Report, as well as perform several functions that are unique to this page.
Step-by-step guide
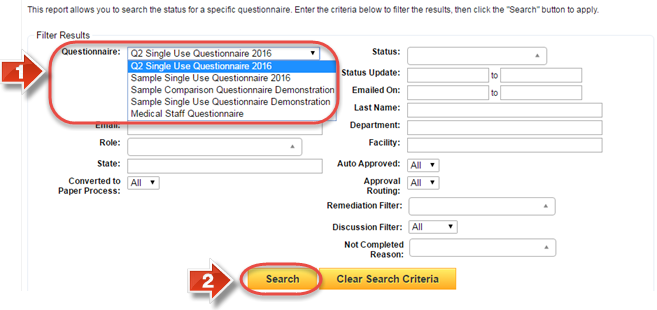
Of all of the search filters available, the only one that is required is the 'Questionnaire' filter. Select the questionnaire from the dropdown menu. The chosen questionnaire is the one from which participants will be shown. (It is not required to use any other search filters on this page. If you simply wish to bring up a list of all participants without filtering, you may click the Search button right away to do so. If you are using filters, please consult the following pages and configure the necessary filters before clicking 'Search')
- Show Me
The 'Status' filter allows you to select one or more statuses of participants to include in the search results. Only participants that currently have one of the selected statuses will appear in the participant list.
- Show Me
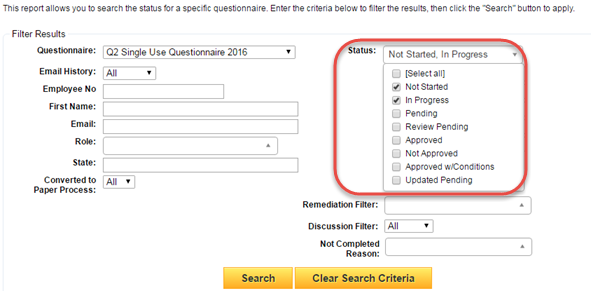
- Click here to see a summarized list of the different Statuses available
Not Started – Searches for participants who have not yet started the questionnaire.
In Progress – Searches for participants who have begun but not finished the questionnaire.
Pending – Searches for participants who have finished the questionnaire but have not yet had their results evaluated.
Review Pending – Searches for participants whose results have been examined by an approver but not yet approved or declined.
Approved – Searches for participants whose results have been reviewed and approved.
Not Approved – Searches for participants whose results have been reviewed and declined.
Approved w/ Conditions – Searches for participants whose results have been reviewed and approved, with comments provided to ensure the results remain non-conflict.
Updated Pending – Searches for participants who have submitted their responses more than once in a single reporting period and have not been automatically approved.
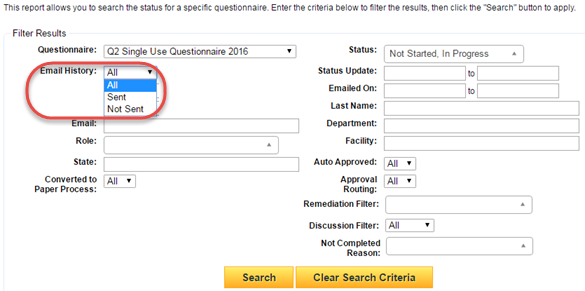
The 'Email History' filter will show participants that do or do not have an Email history depending on the choice selected.
- Show Me
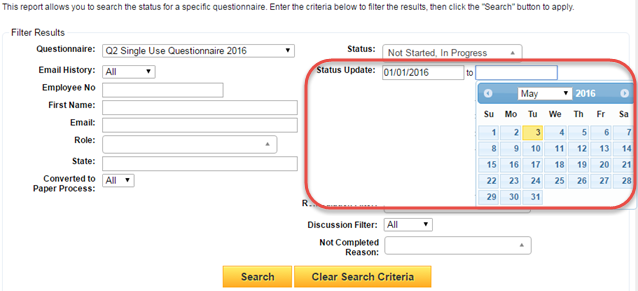
The 'Status Update' filter will only show participants who have had a status change between the date ranges entered. You may select dates from the pop-up calendar for each of the two fields.
- Show Me
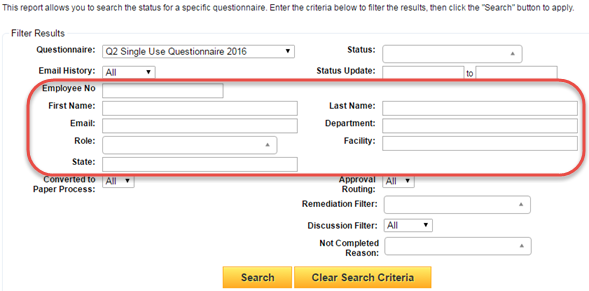
Many of the filters are based on participant attributes and will search those fields for matching data. For example, if you were to enter “Smith” in the Last Name field, you would bring up a list of participants whose last name contained or matched “Smith.” If you wanted to see a specific participant, you could enter their 'Employee Number' and it would bring up any participant whose Employee Number contained or matched the text entered. You may also mix and match any of the filters to create a very specialized search. ('Role' is a multi-select dropdown containing all roles enabled by the specific questionnaire. If no roles are restricted, then all roles will be displayed in this dropdown menu)
- Show Me
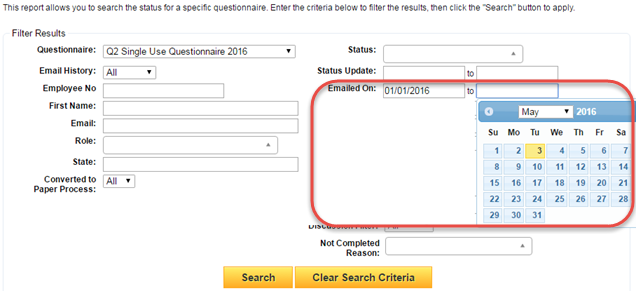
The 'Emailed On' filter will show participants who received an Email Template within the date range entered. This works similar to 'Status Update', but is dependent on Email communication rather than participant status change.
- Show Me
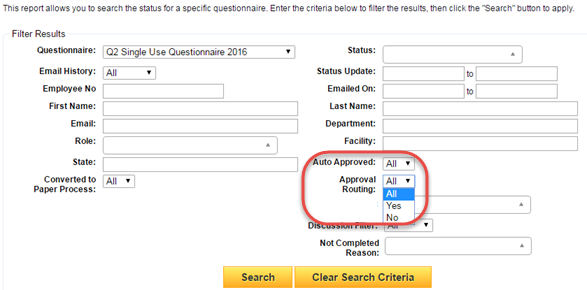
When set to Yes, 'Auto Approved' will show participants who were approved using auto approval logic. Similarly, when set to Yes, 'Approval Routing' will show participants who currently have or have had an active approval routing workflow. Setting No for either of these filters will exclude participants who underwent one of the two approval processes.Because these two approval methods are separate, it is recommended to only use one of these filters at a time. If approval routing workflow and auto approval are not enabled, then no participant results will display when selecting Yes for these filters.
- Show Me
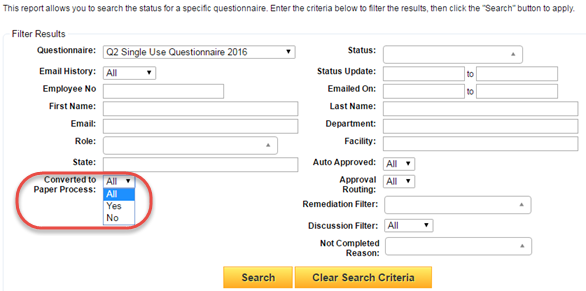
Converted to Paper Process will show or hide participants who underwent the paper process conversion by an administrator, depending on the option selected.
- Show Me
Remediation Filter will show participants who have a remediation plan on their profile. Further, if specific statuses are selected, only participants with a remediation plan that matches that status will be displayed.
- Show Me
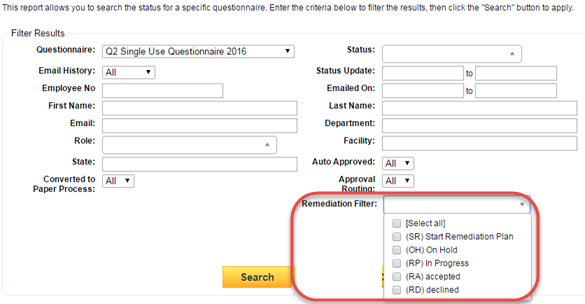
- Click here for a list of possible remediation plan options
SR (Start Remediation) – Participant is eligible for a remediation plan by being in Not Approved or Approved with Conditions status and not converted to a paper process.
RP (Remediation Pending) – Participant has had a remediation plan created but has either not reviewed the remediation plan or has not accepted or declined the remediation plan.
RA (Remediation Accepted) – Participant has had a remediation plan created, received it, and accepted the remediation plan.
RD (Remediation Declined) – Participant has had a remediation plan created, received it, and declined the remediation plan.
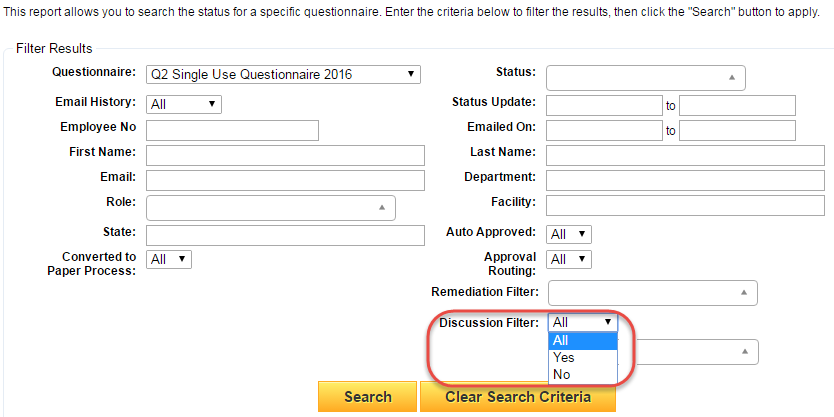
Depending on the selection made, Discussion Filter will show or hide participants with a discussion on their profile.
- Show Me
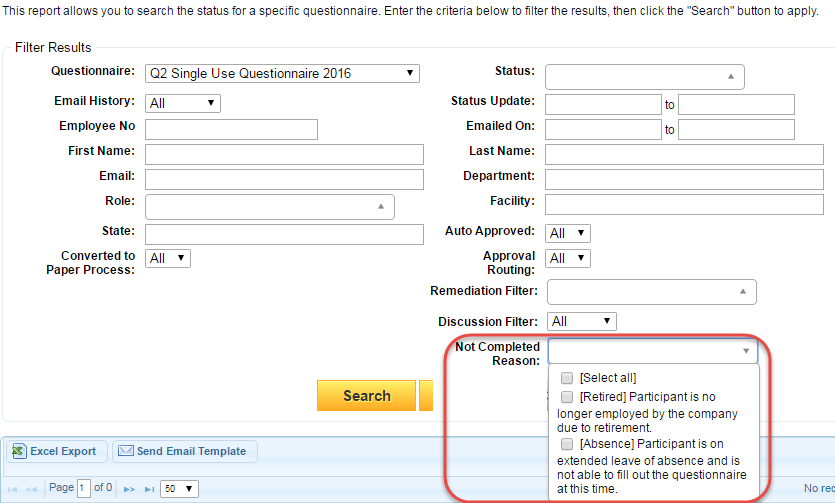
If your company uses Not Completed reasons, then the Not Completed Reason filter will show only participants who have one of the selected reasons associated with their profile.
- Show Me
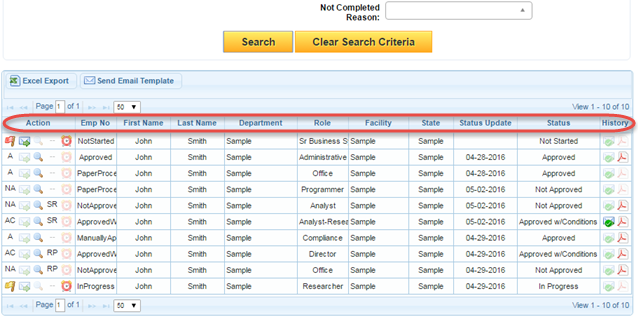
- Directly below the search filters, you will find the participant list. The results displayed in this list will depend on the filters used. The columns in this list detail the following:
- Participant List Table Columns
Action – Controls several administrative actions that will affect the specific participant. You will learn more about these functions further in this user guide.
Emp No – The participant’s employee number.
First/Last Name – The participant’s first and last name.
Department – The participant’s department.
Role – The Role(s) that have been selected for the participant.
Facility/State – The participant’s facility and state.
Status Update – The date that the participant’s most recent status change occurred.
Status – The participant’s current status.
History – The envelope icon in this column will list the history of Emails sent to the participant. If no Emails have been sent, this icon will be grayed out. The PDF icon leads to the participant’s Attestation Report. If the participant has not completed the questionnaire at least once, this icon will be grayed out.Workflow – Shows the participant's approval workflow history, starting with the most recent, and allows re-sending of an approval workflow Email if the participant's current workflow is still active and waiting for an approver's decision. This column may not display if approval workflow is not being used in the questionnaire.
- Show Me
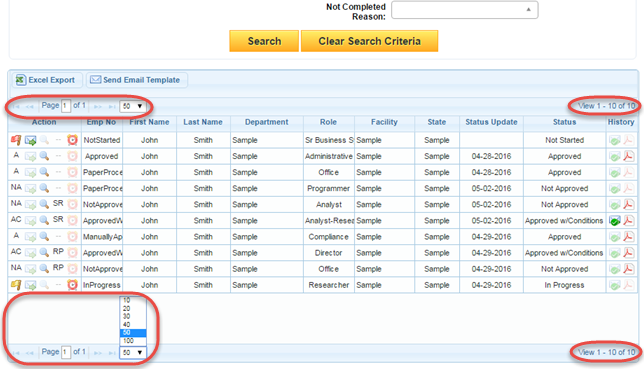
The top and bottom of the participant list has functions available for multiple pages of participants. Using the arrow icons, you may move from one page to another. The dropdown menu changes how many participants will appear on each page of the list; this is up to 50 by default, but can be changed freely. The current and total number of participants on the list is displayed on the right side of the list.
- Show Me
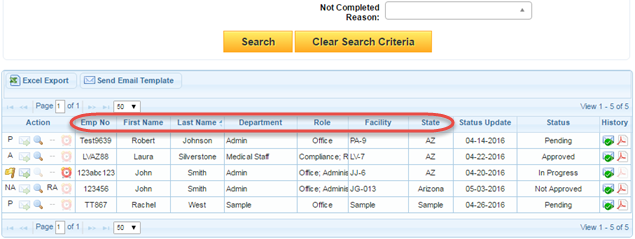
For the Employee Number, First Name, Last Name, Department, Role, Facility, and State columns, you may click the column header to sort the participant results based on that column. Clicking once will list participants in ascending order (From A to Z) based on that column. Clicking again will list participants in descending order (From Z to A) based on that column. (These sorting methods do not carry over to the Excel Export spreadsheet.)
- Show Me
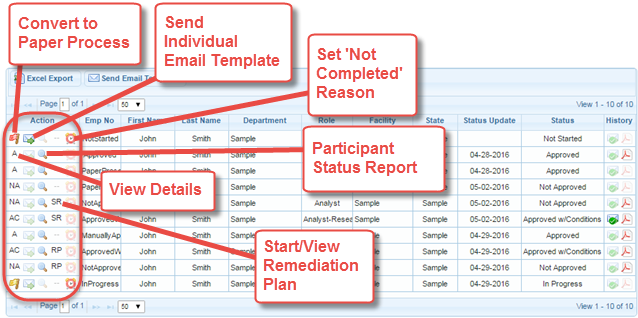
- Under the 'Action' column, there are several actions available for individual participants. Some of these actions are only available under certain circumstances.
- Show Me
- Click here for a summary of participant Actions
Convert to Paper Process – Changes participant to Pending status and allows manual answer selection.
Send Individual Email Template – Send Email template to one participant. Only available if participant has a status of Not Started or In Progress.
Set ‘Not Completed’ Reason – If the participant is in Not Started or In Progress status, you may select a reason here.
Participant Status Report – View all details of a participant and their most recent attestation. Other actions are also available.
View Details – See an overview of participant’s responses and perform basic actions. Not available if participant is in Not Started status.
Start/View Remediation Plan – Remediation plans may be created and edited from this menu.
- Click the Excel Export button.
- Show Me
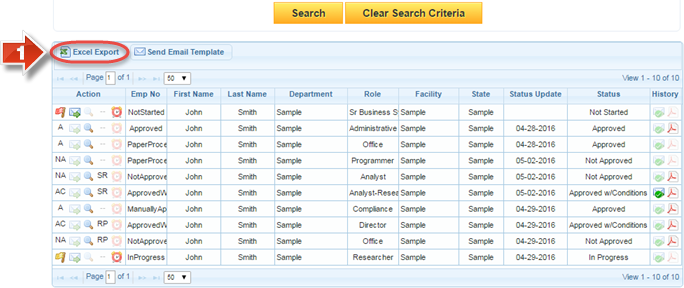
- The spreadsheet contains columns identical to those seen on the Status Report page, and lists one row for each participant.
- Example

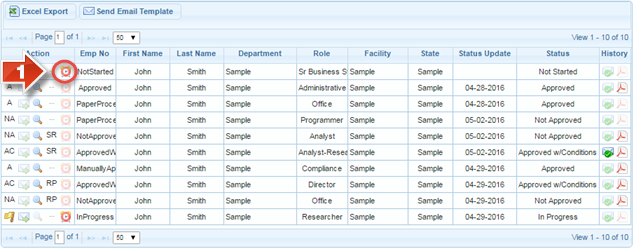
- Click the alarm clock icon under the participant's 'Action' column.
- Show Me
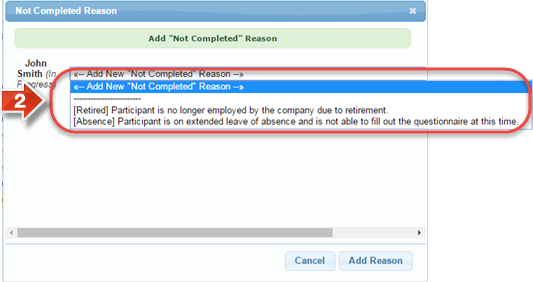
- Using the dropdown menu, select the Reason why the participant has not completed the questionnaire.
- Show Me
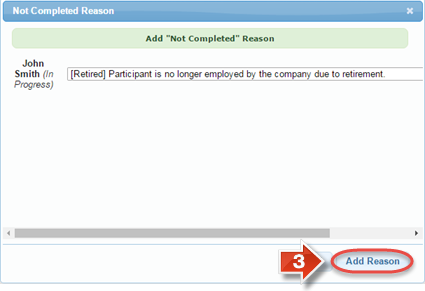
- After choosing the reason, click the Add Reason button to confirm.
- Show Me
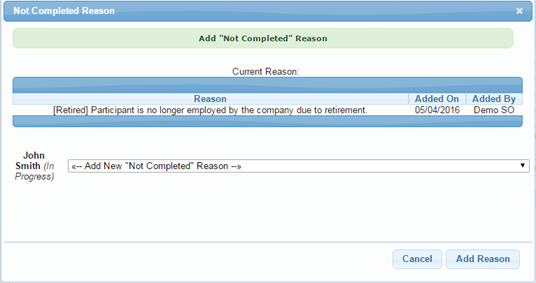
- If the Not Completed icon is selected for a participant that already has a reason, the current reason will be listed on the window. However, a new reason may be selected if required.
- Example
click the magnifying glass icon under the Action column.
- Show Me
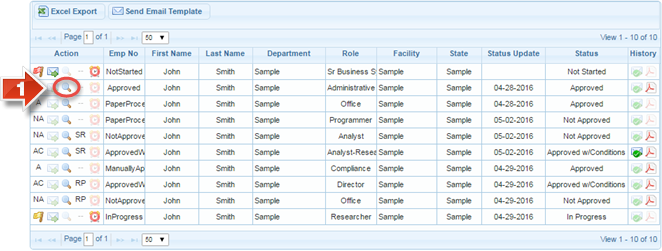
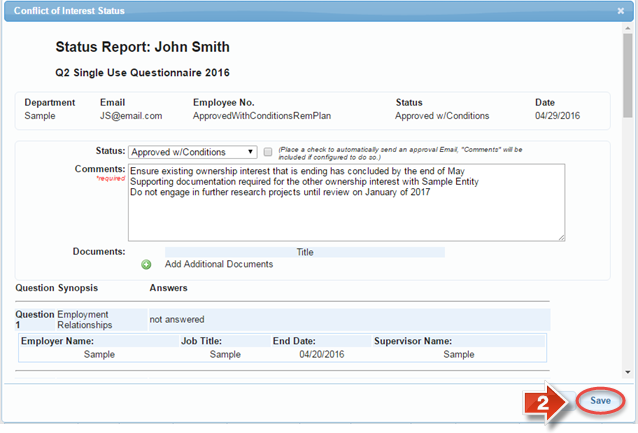
At the top of the Status window, the participant’s basic information will be displayed. Along with their Department, Email address, and Employee Number, there is a section indicating their Status and the Date their status was changed. If no approval routing workflow is enabled for the questionnaire, you may change the participant’s Status using the dropdown menu. You may also enter Comments in the text box, which can also be used for guidelines for the Approved with Conditions status.
- Show Me
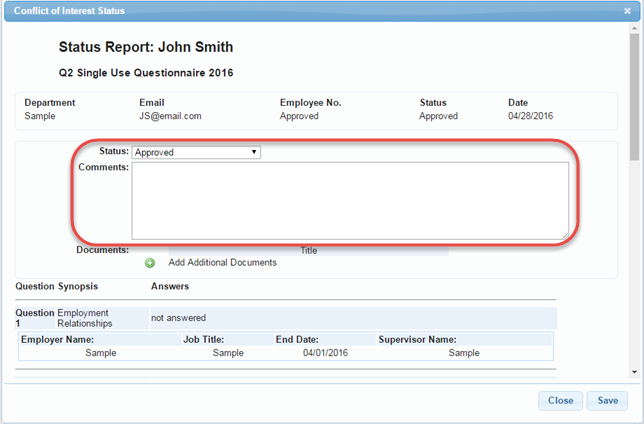
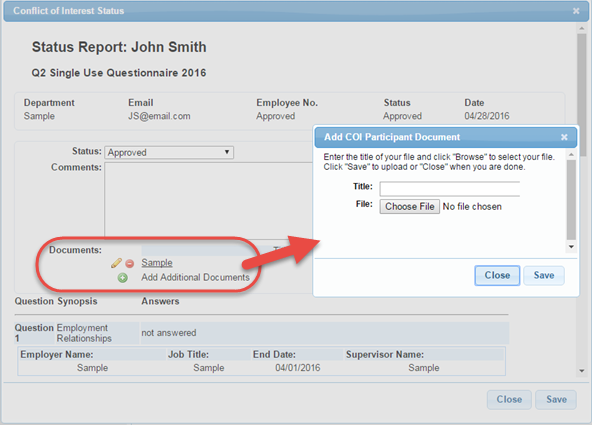
Using the Documents section, you may add PDF documents specific to the participant. Give the document a Title, and select the File from your computer. To view the uploaded document, it may be necessary to reload the Status window by closing and re-opening it.
Uploaded documents may be shared with participants as part of an Email template.- Show Me
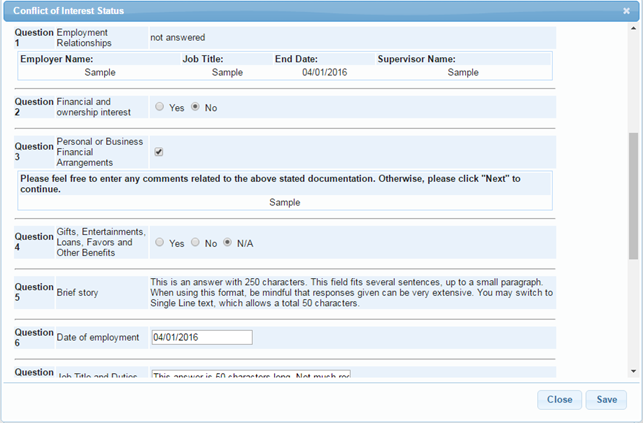
The participant’s responses to the questionnaire are displayed further down the Status window. Each question synopsis, its accompanying answer, and any additional response fields will be displayed row after row. (While it is recommended to have the participant re-enter the questionnaire to make any updates, it is also possible for an administrator to change some answers. This is only recommended for unique situations, such as fixing a mechanical error by the participant when responding to the questionnaire.)
- Show Me
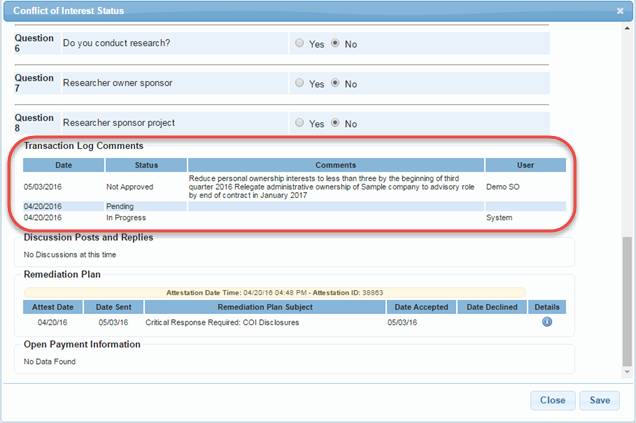
Below the questions, the Transaction Log details the participant’s status changes. The Status and the Date of the change are always displayed. When applicable, Comments that were entered at the time of the status change will be displayed, along with the User that initiated the change.
- Show Me
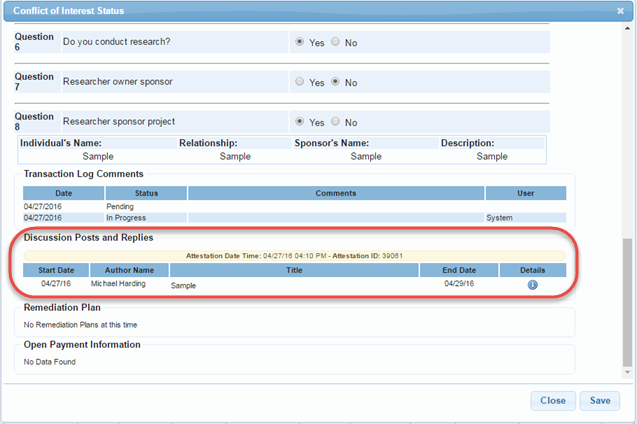
If the questionnaire is under an approval routing workflow, it is possible that a participant may have one or more discussions associated with their profile. A brief summary of the discussion’s Start Date, Author, Title, and End Date are available from this window, with an option to view more specific information using the information icon under the Details column.
- Show Me
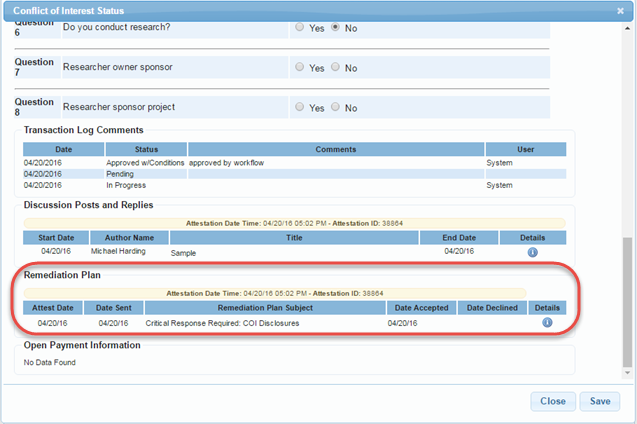
Remediation Plan information is also available from this window when applicable. It contains the Attest Date of the questionnaire, the Date Sent of the plan itself, the Subject, and the Date Accepted or Declined depending on the participant’s reaction. The Details column also contains a full copy of the plan.
- Show Me
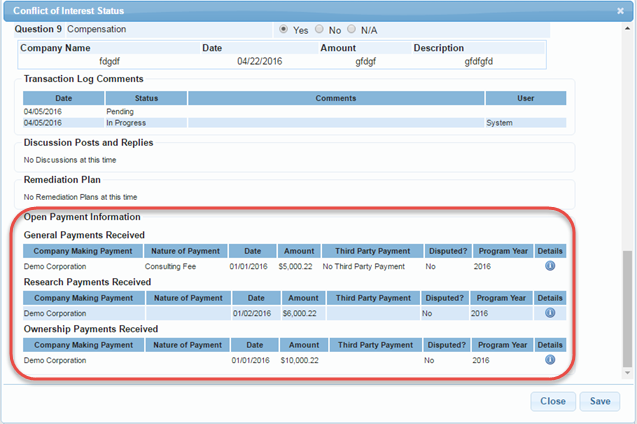
If the participant has been linked to CMS Open Payments data, a brief summary of that data will be displayed in this section of the Status window. Under the Details column, the information icon for each record will contain a full copy of the Open Payments data. (Please keep in mind that this feature is only activated via Submit a Request.)
- Show Me
After making any necessary changes to the Status window, click the 'Save' button to confirm.
- Show Me
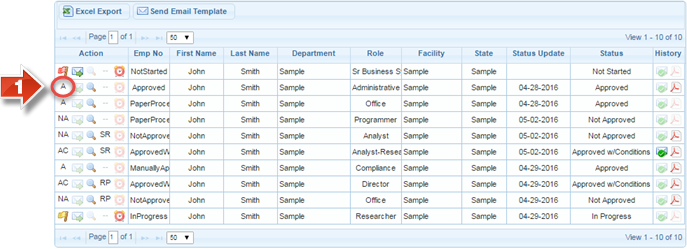
Access the Details window by clicking the letter on the far left under the Action column. (This is only available for participants with a status other than Not Started or In Progress. The letter in this column is based on the current status. For example, “A” is for Approved, “NA” is for Not Approved and “AC” is for Approved with Conditions.)
- Show Me
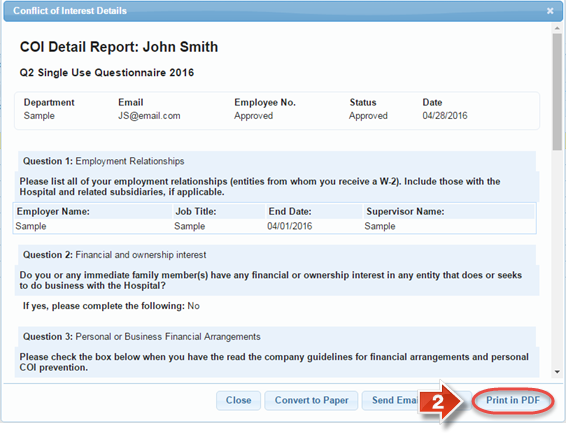
The Details window shows the participant’s basic information and the responses to their latest questionnaire, similar to the Status window. The buttons Convert to Paper and Send Email Message are identical to the symbols under the Action column on the Status Report page. The Details window also has the ability to view the participant’s results as a PDF file. To do this, click the 'Print in PDF' button.
- Show Me
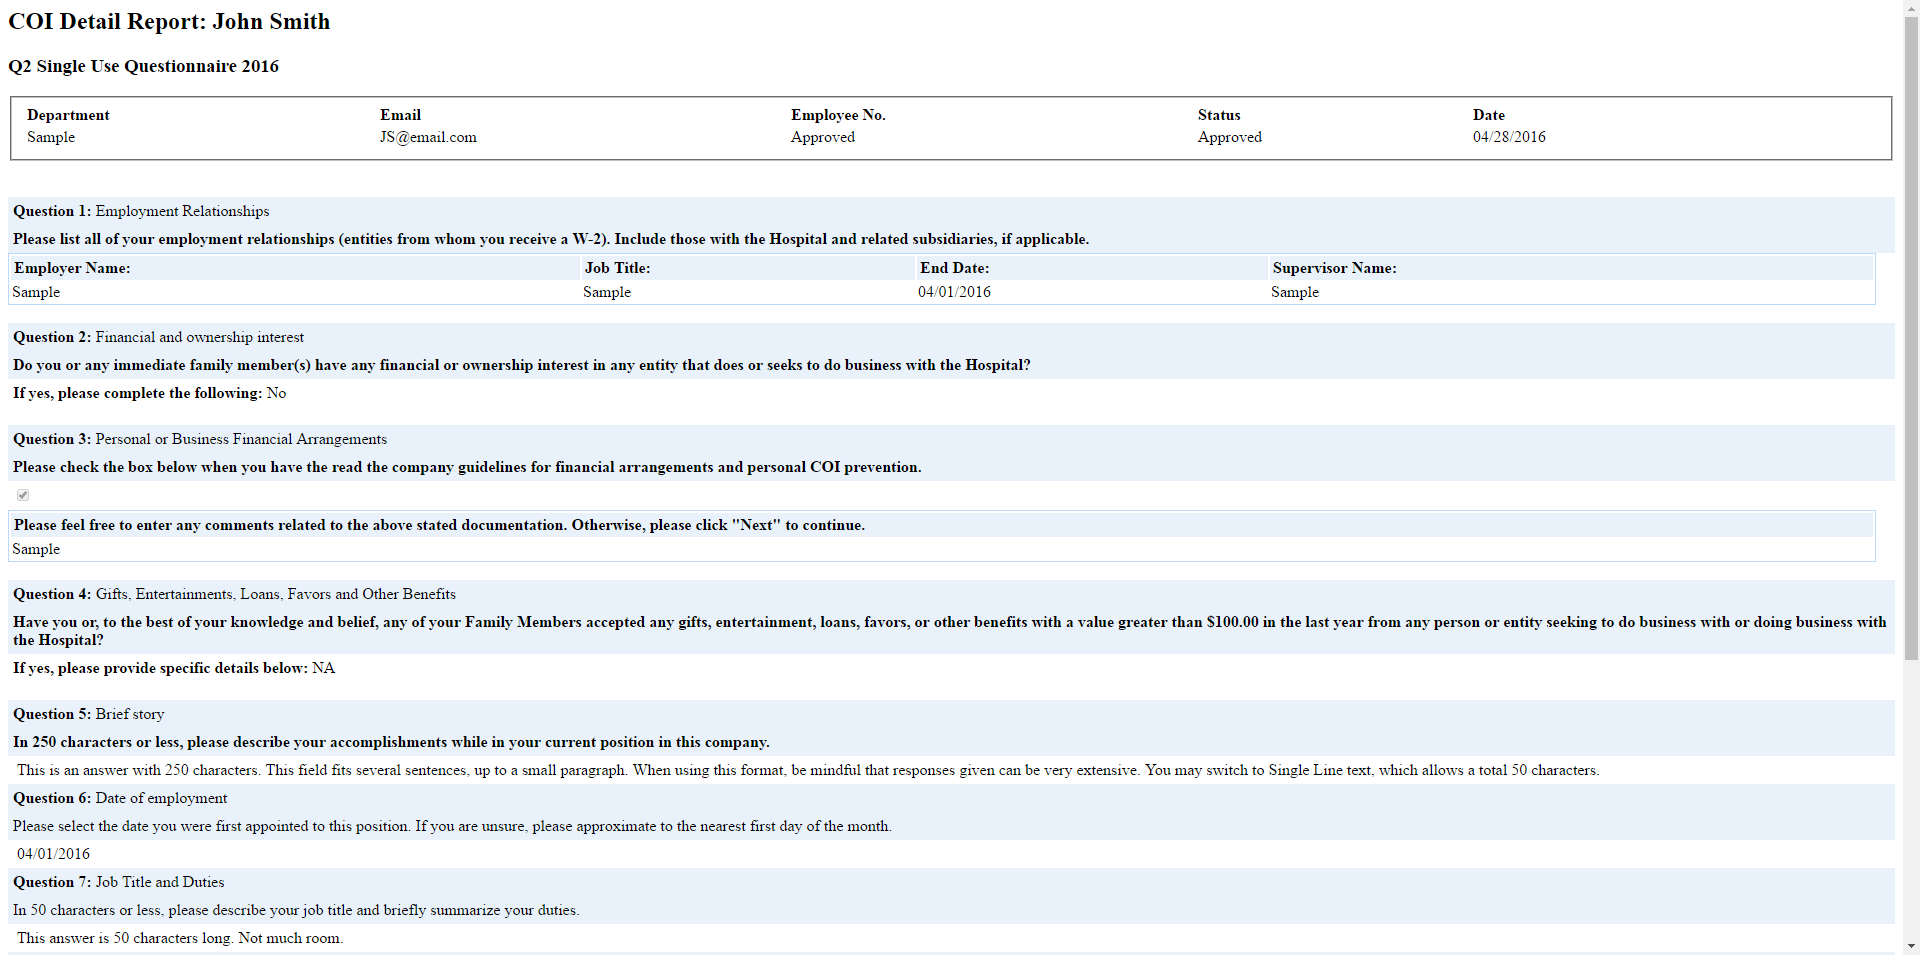
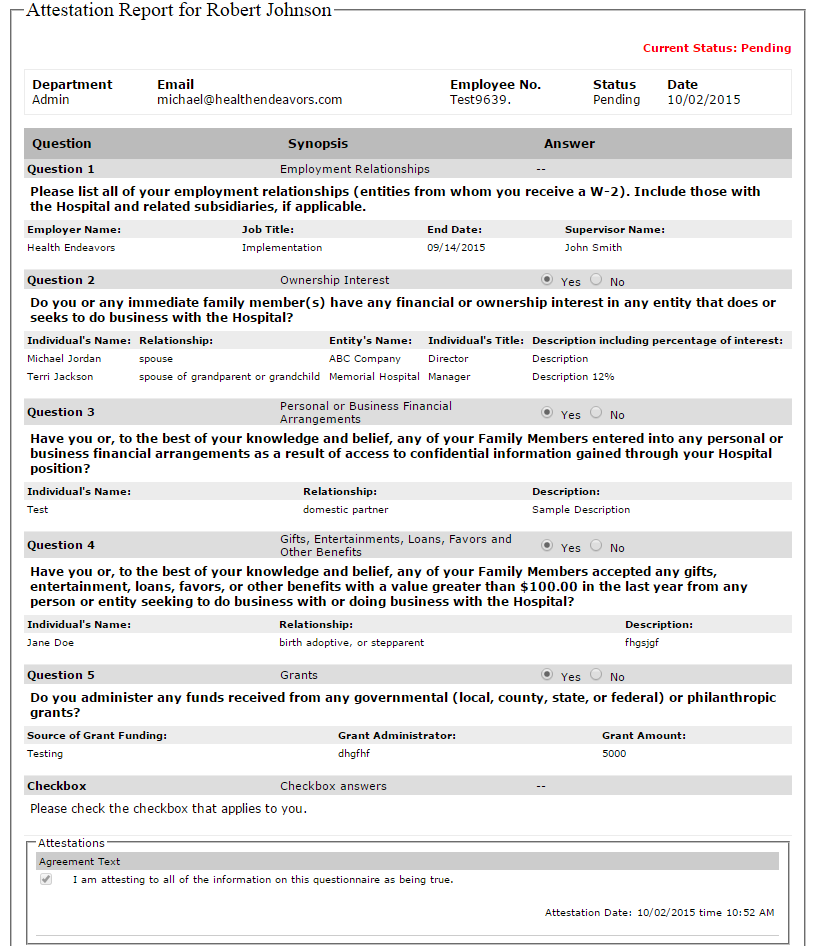
The report page that opens will format the questionnaire responses, allowing you to save the page as a PDF for ease of viewing and printing later.
- Example
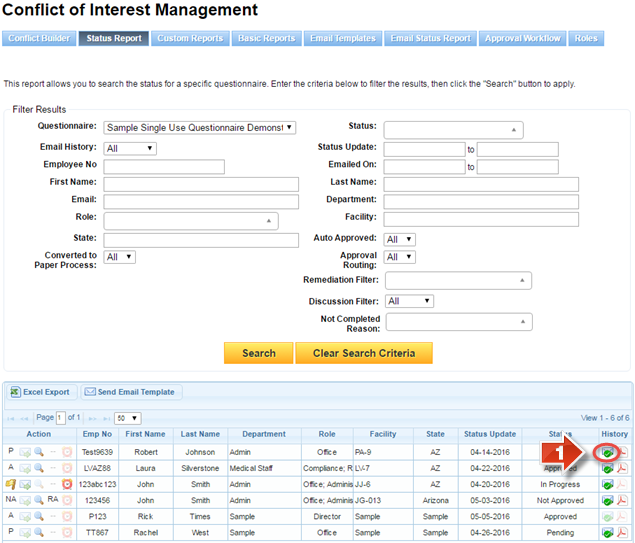
Click the envelope icon under the History column. (If the participant has not received an Email before, the icon will be grayed out.)
- Show Me
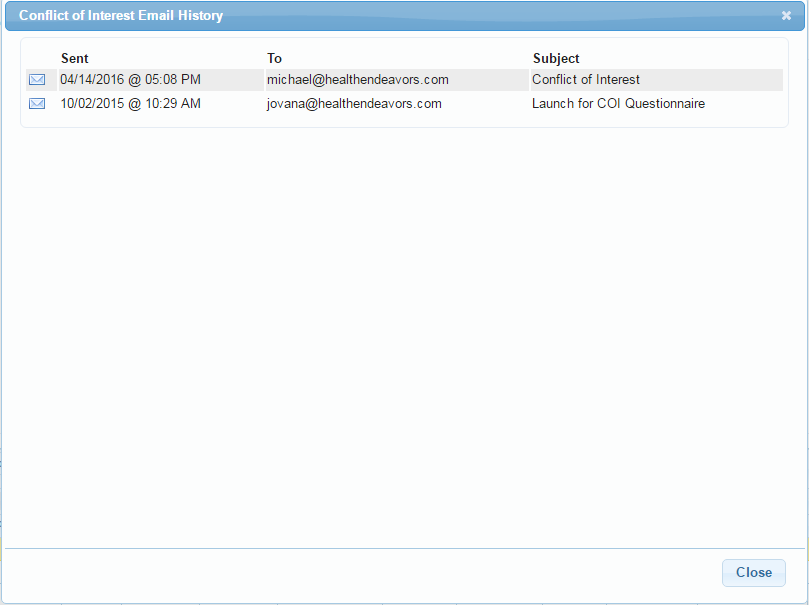
Basic information about each Email is available. The date Sent, the Email address sent To, and the Subject of the Email are all summarized in this window.
- Example
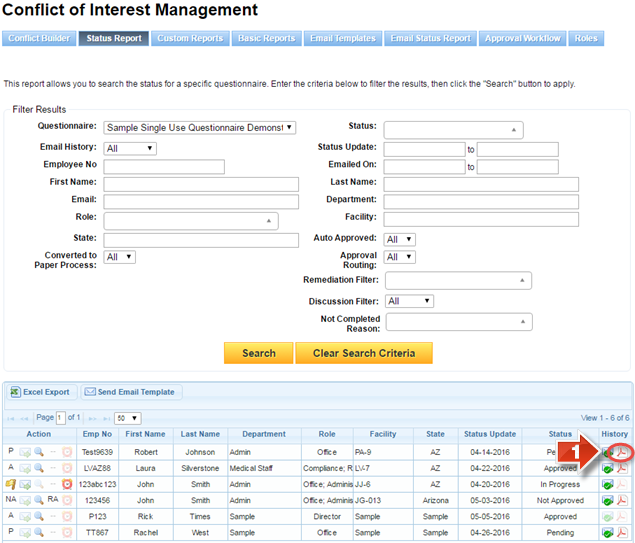
Click the Adobe PDF icon under the History column.
- Show Me
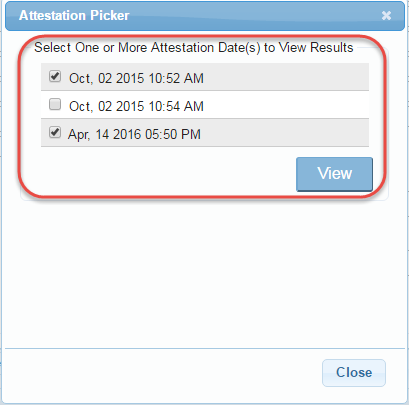
The Attestation Picker window allows you to select one or more attestations based on the date of submission. After choosing at least one, click the View button to see the report.
- Show Me
The attestation report includes the status at the time of the submission, as well as a copy of the general agreement and date of submission at the bottom. If multiple dates of attestation reports were selected, they will appear on this page one after another.
- Example
Related articles
-
Page:
-
Page:
-
Page:
-
Page:
-
Page: