Approve Participants through the Approver Dashboard
Use this process to review all participants awaiting an approval decision from you, as well as to process participants one at a time or multiples at once.
Step-by-step guide
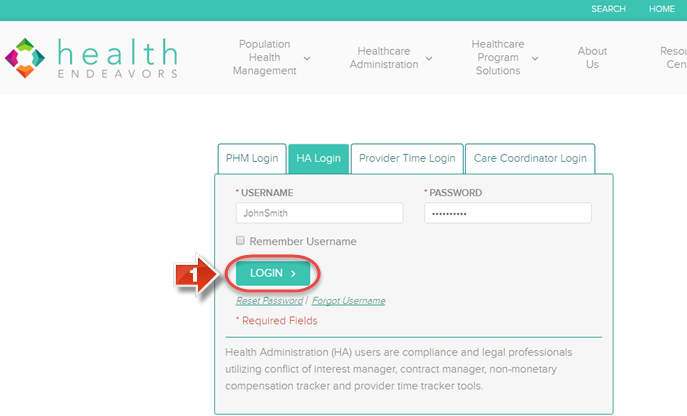
- Once an approver has registered their Username and Password, they may sign in using their login credentials on www.healthendeavors.com/login. (Please be sure that the tab labeled HA Login is selected. Other tabs will not function correctly for approver logins.)
- Show Me
- After logging into the system, click the 'Start' button under Conflict of Interest Manager.
- Show Me

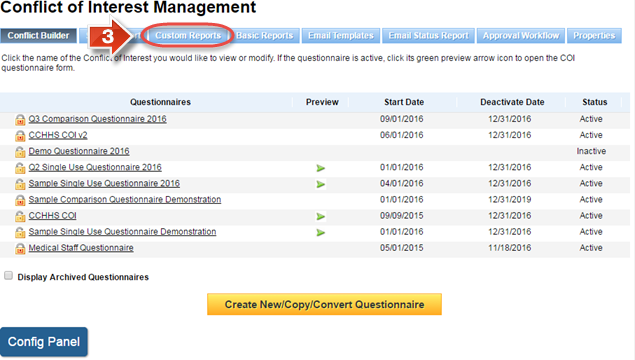
- To access the approver dashboard, click the 'Custom Reports' tab.
- Show Me
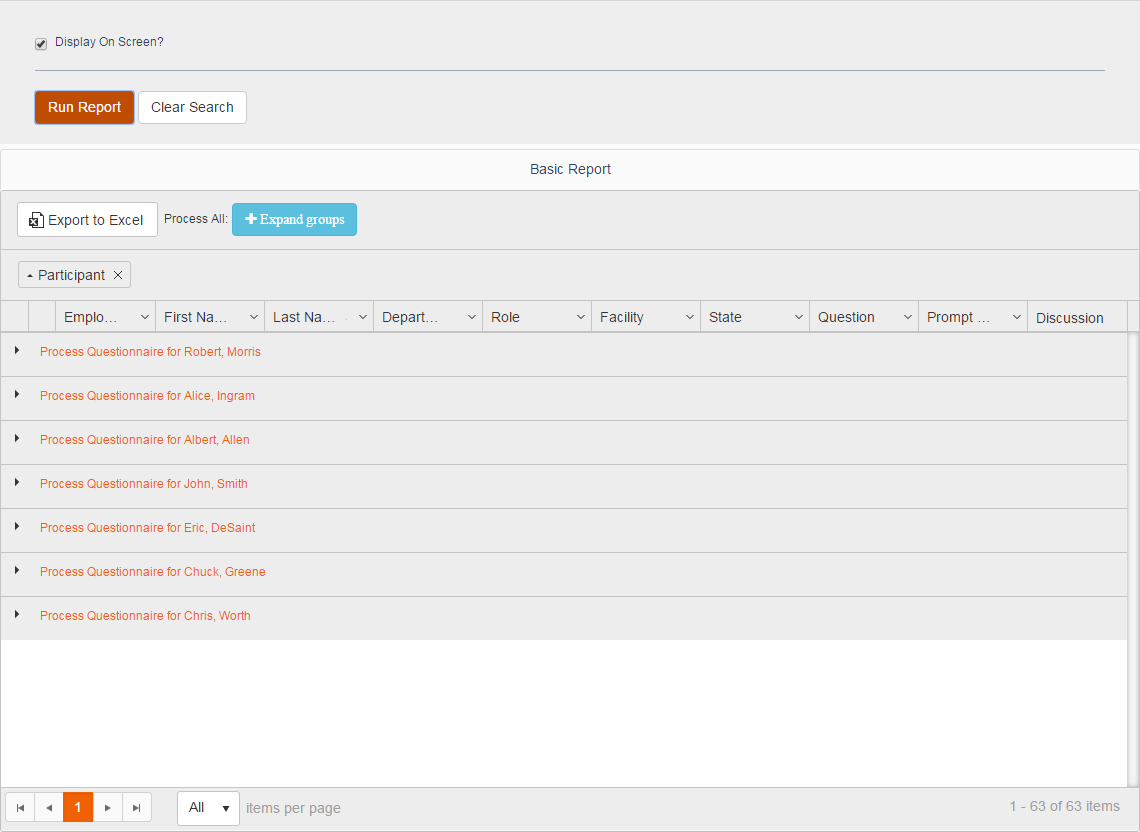
- At the bottome of this page, all participants in your queue are listed in the dashboard.
- Show Me
- On the Approver Dashboard, there are numerous filters available to narrow the list of participant results. Rather than showing all participants awaiting your approval, these will only show participants who match the filters you choose to use in this section. In particular, if you are not the first or only approver in the current workflow(s), you should consider using the Current Workflow Status filter. Using this filter will allow you to show only participants that have so far been assigned the selected status by previous approvers.
- Show Me
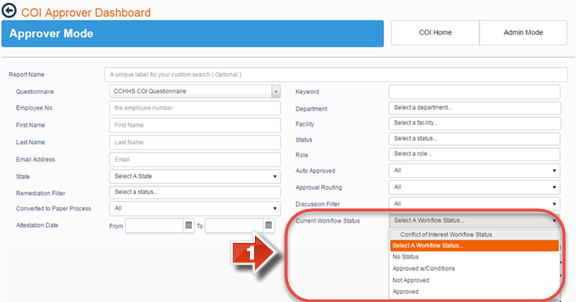
- What do these status selections mean?
No Status - No approvers have made a decision on the participant's status yet. This is usually because you are the first approver, or the only approver in the approval group.
Approved w/ Conditions - At least one approver before you has proposed this status for the participant. No current conflict exists, or the conflict is not severe enough to warrant non-approval, but specific guidelines are required to be followed by this participant to ensure compliance.
Not Approved - At least one approver before you has proposed this status for the participant. The participant has a conflict that must be investigated and resolved.
Approved - At least one approver before you has proposed this status for the participant. The participant has no current conflicts, or any existing conflicts are not severe enough to warrant non-approval.
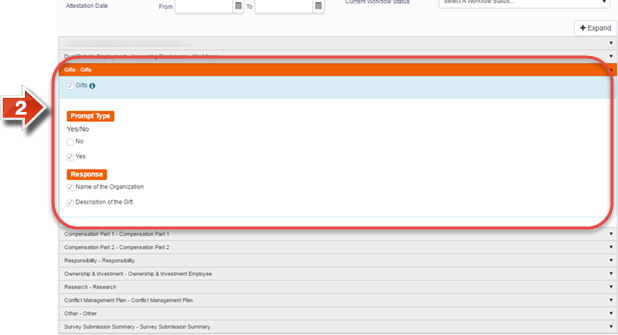
- In addition to filtering by participant profile data, you may also filter by specific questions and responses. Click a question to open it up, and select an option, where applicable by the question format, to only show participants that answered that specific question with the specific answer(s) selected. You may do this for multiple questions to create more specialized search results.
- Show Me
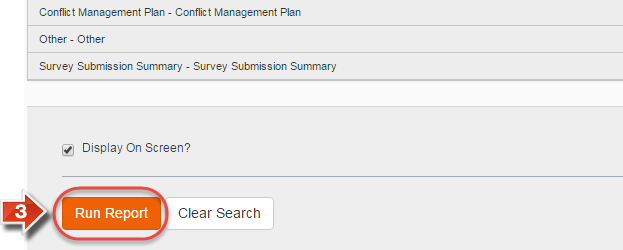
- Whether or not you use any of the previously shown filters, click 'Run Report' to generate a list of participants. (You may also wait and the unfiltered list of participants will populate automatically.
- Show Me
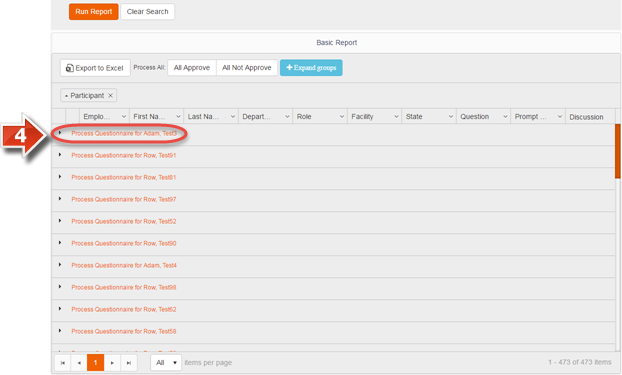
- A list of participants awaiting review will appear on a table at the bottom of the page. By clicking the arrow key to the left of a participant’s name, you may bring up a summary of the participant’s profile data and their responses to the questionnaire. To process a single participant, click their name.
- Show Me
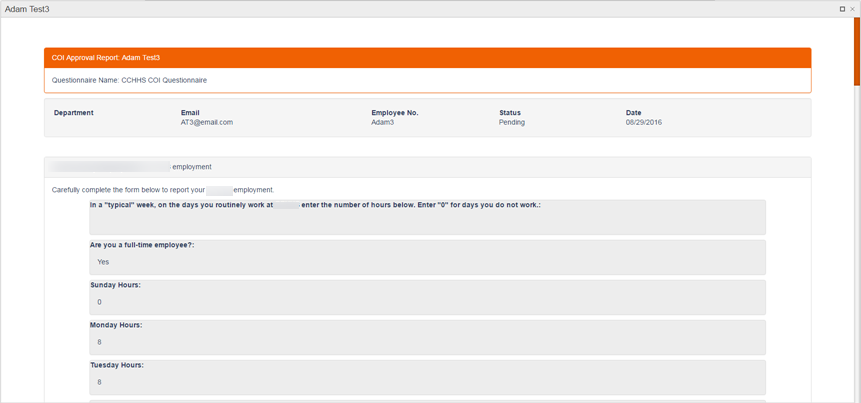
- An approval workflow window will appear. This window lists every question, and the participant’s responses, in exact detail. It is recommended to review the questionnaire carefully at this point, since once a decision is made you will not be able to access this workflow page again for this participant.
- Show Me
- At the bottom of the window, your options will differ depending on what level approver you are.
- If you are the first or only approver in the approval group...
If you are the first approver, or the only approver in a group, you will have the option to approve the submission, setting the participant to Approved status. You may also Decline the submission and set a participant to Not Approved or Approved with Conditions status. Whichever status you select, you may enter workflow Comments that will only be visible by other approvers or administrators.
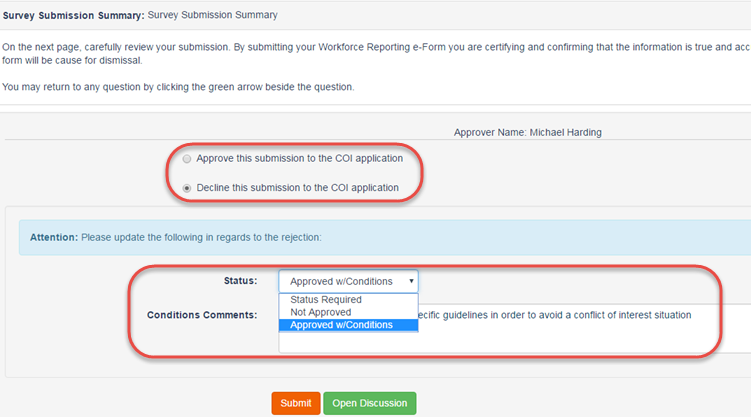
- If you are not the first approver or the only approver in an approval group...
If you are not the first approver in a group of approvers, and the previous approver decided to set the status to Not Approved or Approved with Conditions, you will see the decision made by the previous approver(s) in the group, along with any workflow comments related to the decision. If you agree with the decision, select the Approve option. If you disagree with this decision, select the Decline option. If you decide to disagree with the decision, the workflow will be reset to Level 1. Either way, click the 'Submit' button to confirmyour decision. (You can also create a discussion post for this participant, similar to the process outlined in the previous how-to article.)
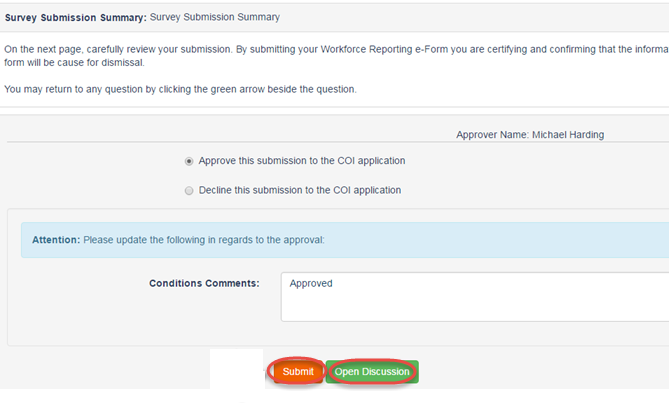
- Once your decision has been made, there is one of three possible outcomes to this workflow:
- What are they?
• If you are the only approver in the approver group, the participant’s status will be changed per your decision.
• If you are the first approver in the approver group, or any other level except the last in the group, the person in the level after you will be prompted to make a decision, either to agree with your decision or to disagree and restart the workflow. If you are the first approver, you may set the recommended status, and all other approvers must agree with your decision for the participant’s status to change.
• If you are the last approver in the approver group, the participant’s status will be changed if you agree with the status selected by the other approvers. If you disagree, then the workflow will start over again at level 1 with your recommended status change for the other approvers to review
- There are three types of mass approval decisions that may be made: Mass approve, mass agree, and mass disagree.
- If you wish to mass approve...
You may proceed to the approver dashboard immediately and fill in checkboxes for the participants to be mass approved. After selecting the participants, click the 'All Selected Approve' button.
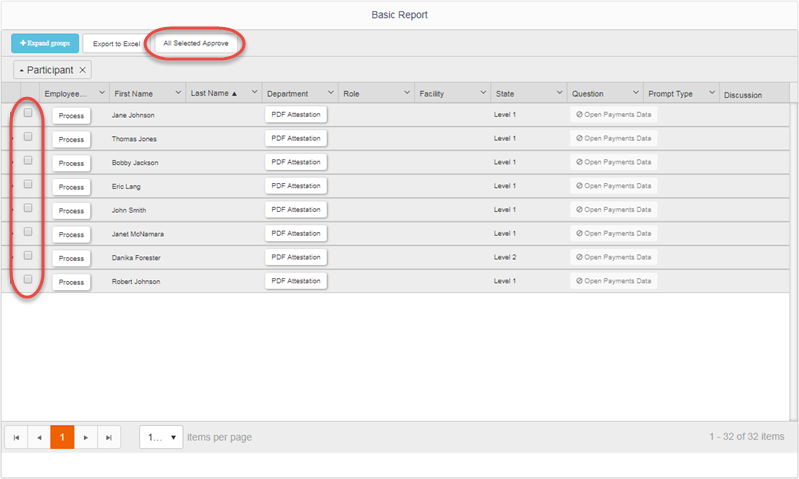
- If you wish to mass agree...
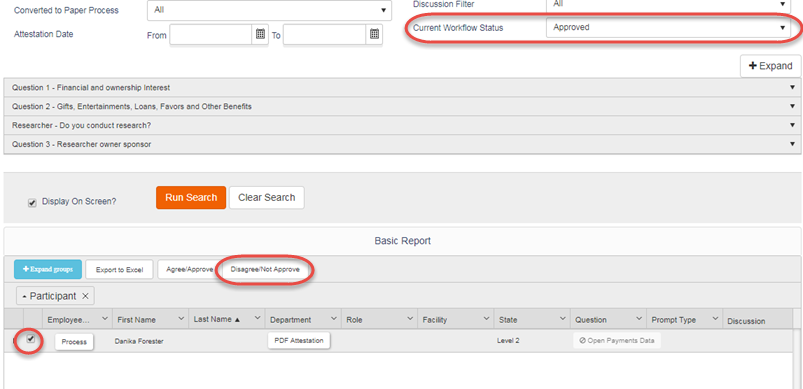
First, select a status from the 'Workflow Status' filter. Then, after running the report, the participant list will be filtered based on participants with that proposed status. Fill in the checkboxes for participants to be pushed forward with the proposed status, and click the 'Agree/Approve' button. (This will not change the participants' status to Approved; it just means that the currently proposed status is accepted.)
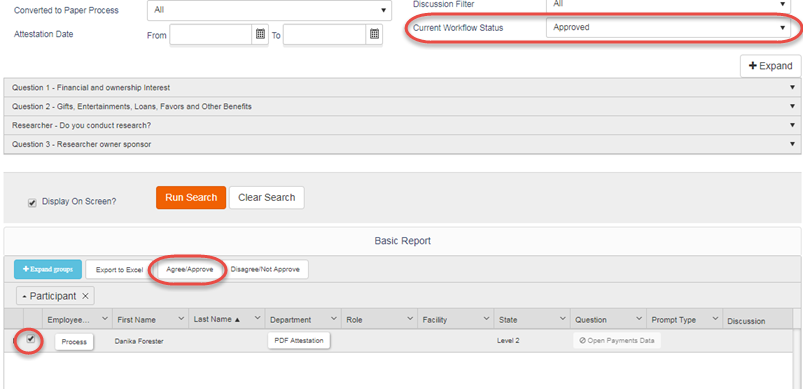
- If you wish to mass disagree...
First, select a status from the 'Workflow Status' filter. Then, after running the report, the participant list will be filtered based on participants with that proposed status. Fill in the checkboxes for participants to be pushed forward with the proposed status, and click the 'Disagree/Not Approve' button. (This will reset the approval workflow for each selected participant, and the first approver must return to make a proposed status decision.)
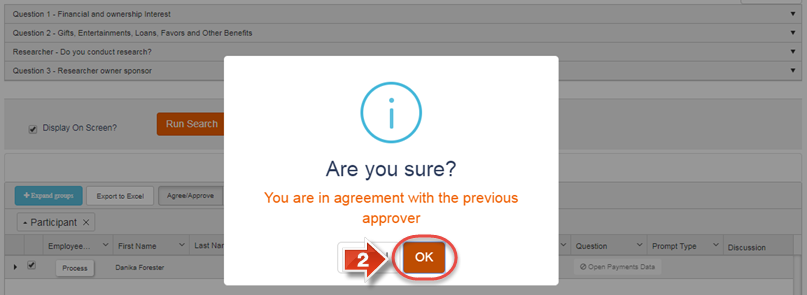
- After making your mass approval decision, a window will pop-up confirming that you wish to go with that decision for all selected participants. Click the 'OK' button to continue.
- Show Me
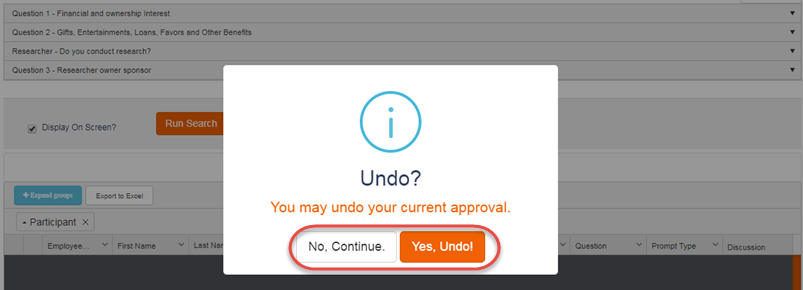
- After the process finishes, the window will update to confirm this. At this point, you may still roll back the decision you just made with the orange button. This will reset all participants to their status before your decision was made. Or, you may click the gray button to move forward. (Changes may not be undone once this window is closed with the gray button.)
- Show Me
Did you know: Here's some general advice about the approver dashboard.
In an approver group with multiple approvers, participants will not appear in your dashboard until it is your turn to review them. Once you have made your decision, the next approver will have the participants appear in their dashboard in turn.
When using mass approval, you will only have the ability to undo the mass approval while the mass approval window is open. If you close out of the window or click No, Continue then the decision will be passed on to the next approver, or the participant’s status will be changed immediately after if you are the only approver or the last approver in a group.
If you are not the only approver or last approver in a group, an approver on a higher level can still disagree with the decision made by the rest of the group and start the workflow over again. If you see a participant reappear in your dashboard, be sure to check that participant for workflow comments that may indicate why their approval queue restarted.
If you wish to mass approve a group, but not all participants listed on the participant data table, you may use other filters in combination with the Workflow Status filter. For example, if you further reduced the participant list by adding a filter based on Department, or based on a response to a specific Question, then any participants who were removed from your dashboard through that filter will not be mass approved or affected in any way.
You can review a participant's entire questionnaire with responses by clicking the 'PDF Attestation' button. If your questionnaire uses open payments imports, any participants with this data will have an active 'Open Payments Data' button that will allow you to access and review that information.
Related articles
-
Page:
-
Page:
-
Page:
-
Page:
-
Page: