PNMC Tracker Add Record File Import
The purpose of this user guide is to show how to add a record to the Tracker.
After reviewing this user guide, you will be able to perform several tasks:
- Add a record.
- Add multiple records with File Import.
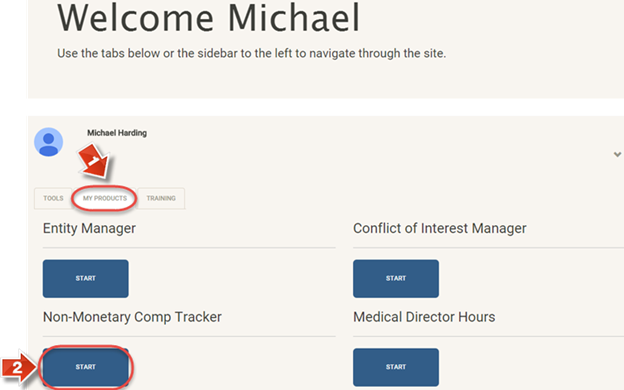
When you log in, on the Join the Endeavor Homepage go to the “My Products” tab (1) and access the “Non-Monetary Comp Tracker” (2).
Add Record
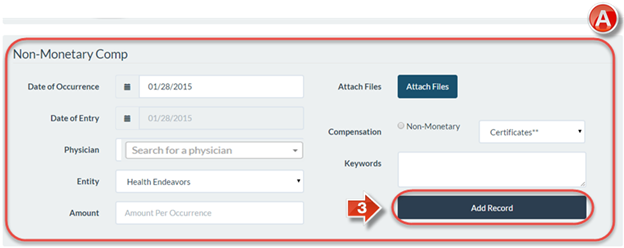
The “Comp Records” page (A) is the main page of the Physician Non-Monetary Compensation Tracker. This page will show available fields when adding records. Adding a record involves the following attributes:
- Date of Occurrence – The date the transaction or compensation took place.
- Date of Entry – The date of the record being submitted (Always the current date).
- Physician – The physician that received the compensation. You may type all or part of the physician’s name, and select the desired entry from the list of automatically populated results.
- Entity – The company or Entity that provided the compensation.
- Amount – The dollar value of the compensation.
- Attach Files – Clicking this will allow the uploading of a PDF alongside the record. This is typically used for receipts, accompanying documentation, etc.
- Compensation – The type of compensation, either Non-Monetary or Staff Benefit Items (If used by your company), and the category under this compensation type (Meals, certificates, etc).
- Keywords – Any quick reference keywords that should go with the record in case a specialized report is desired at a later time.
Click the “Add Record” button (3) to confirm submission of the new record.
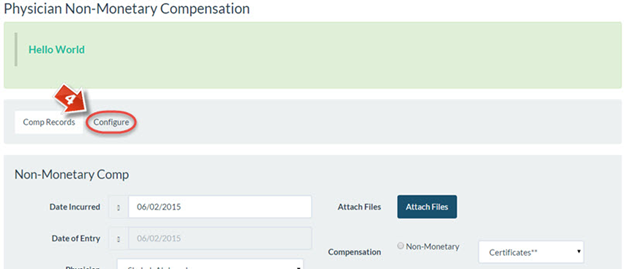
There is also a way to add multiple records at the same time. Click the “Configure” tab (4).
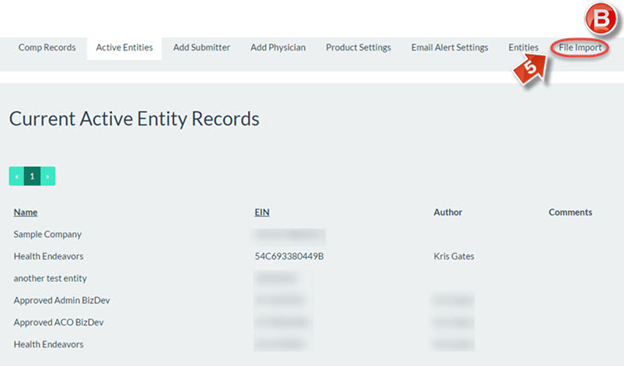
Clicking the “Configure” button opens the “Entity Records” page (B). To continue, click the “File Import” tab (5).
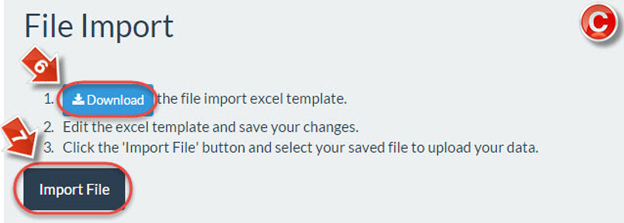
On the “File Import” page (C), it is possible to download a spreadsheet template with the “Click Here” link (5). After filling out this spreadsheet with the necessary information, click “Import File” (6) to upload all records at once. An example of this spreadsheet is shown on the next page. While the attributes of the spreadsheet are similar to those on the “Add Record” page at the beginning of this user guide, a glossary is included with the example spreadsheet.
If a physician that is not in the database is included in the mass file import spreadsheet, that physician will be added to the database automatically. Further, if there is an error with any of the columns in the spreadsheet, an error message will generate informing you of the field that requires revision.
Note: It is only possible to import a spreadsheet if it uses .csv format. This is a common format in Excel, but if you are not filling in information on the downloaded template spreadsheet, it may not save to this file type by default. To check, go into your Excel spreadsheet and under File click Save As. If the spreadsheet is a .csv file, it will show this under the Save as Type menu by default. If not, you are able to change it to a .csv file by using the Save as Type drop down menu.
Spreadsheet Example
- physician firstname – The first name of the Physician receiving the compensation.
- physician lastname – The last name of the Physician receiving the compensation.
- entity EIN – The identification number of the Entity providing the compensation.
- dateincurred – The date the transaction or compensation took place.
- yearincurred – The year the transaction occurred. Please note that this is required separately from the date in order to classify the compensation in the proper year folder when moving on to future years.
- compensationtype – The type of compensation, either Non-Monetary or Staff Benefit Items (If used by your company).
- nonmonetarydescription – If the compensation type is Non-Monetary, enter the sub-category for the compensation according to what is available when adding a record (Meals, certificates, etc).
- medicalstaffdescription – If the compensation type is Medical Staff Incidental, enter the sub-category for the compensation according to what is available when adding a record (Leave blank if your company does not use this type of compensation).
- amountincurred – The dollar value of the compensation.
- description – A brief description of the compensation, typically serves the same function as the “Keywords” field from adding a record.
- verified – Indicates whether or not the record has verified documentation accompanying it (Leave blank if your company does not use this method of verification).
- submitter firstname/lastname – The first and last name of the submitter adding the record (Leave blank if your company does not use submitters).
