Run a COI Custom Report
Use the processes outlined here to use the Custom Reports page for a variety of reporting tasks. This page combines much of the functionality seen in both the Status Report and the Basic Report pages.
Step-by-step guide
Show Me How to Run a Custom Report
To run a basic custom report, perform the following steps:
- Begin by selecting the 'Custom Reports' tab.
- Show Me
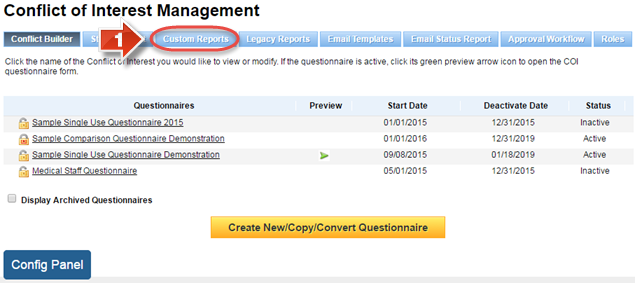
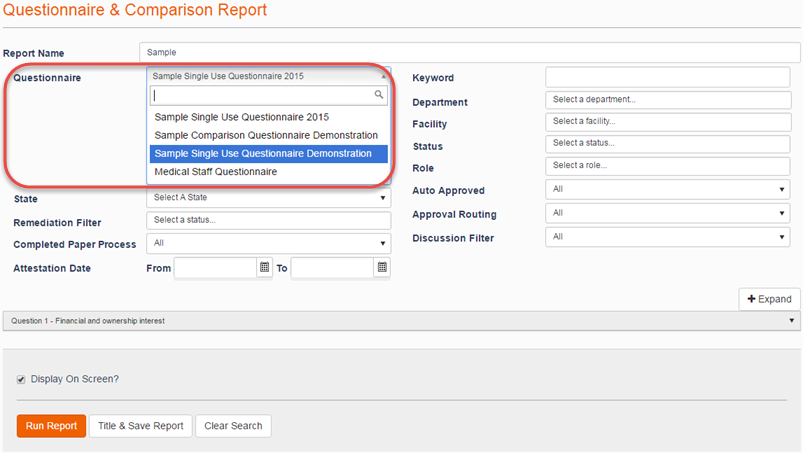
- On the Custom Report page, there are several options and filters available. Using the 'Questionnaire' dropdown menu, select the questionnaire upon which to run the report. If there is only one questionnaire, it will be selected in this dropdown by default. (If you have many questionnaires to search through, you may also type all or part of the questionnaire name in the search field and the list will be narrowed down to any matching results.)
- Show Me
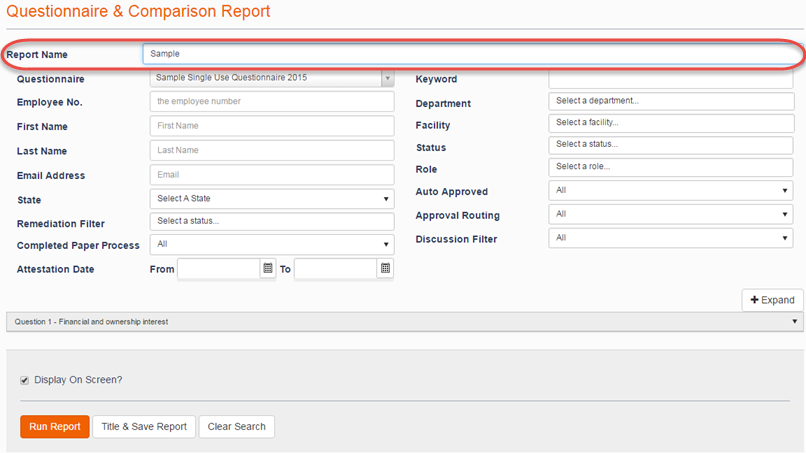
- You may fill in the 'Report Name' field if you wish to save this custom report to be run again at a later time.
- Show Me
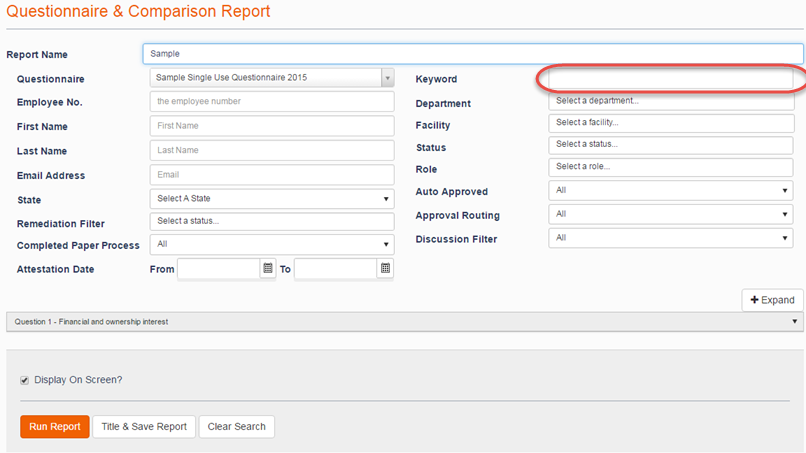
- The 'Keyword' search filter has two separate functions:
• Text that is entered in this field may be used to search and display all responses with matching Multi-Line Text or Single Line Text. For example, if you were to search for “John Smith Memorial Hospital” then this report would show all participant response records which included “John Smith Memorial Hospital” as part of a free-form text response. This searches both the primary question and any accompanying additional response fields.
• A second use for this filter is to look for all responses that match a single word. For example, if you were to search for “Yes” then this report would show all participant responses under Yes/No or Yes/No/NA that were Yes responses. Please note that there is also a way to filter responses in this manner based on individual questions. This will be explained in further detail in this user guide.- Show Me
- The fields Employee Number, First Name, Last Name, Email Address, Department, and Facility will all filter the results list based on matching information in participants’ profiles. For example, if you enter “Smith” in the Last Name field, only participants whose last name contains or matches Smith will appear. (State is also a filter, but uses a dropdown menu instead of a text field. The available options will be based on all the entries for participant profiles under the State field.)
- Show Me
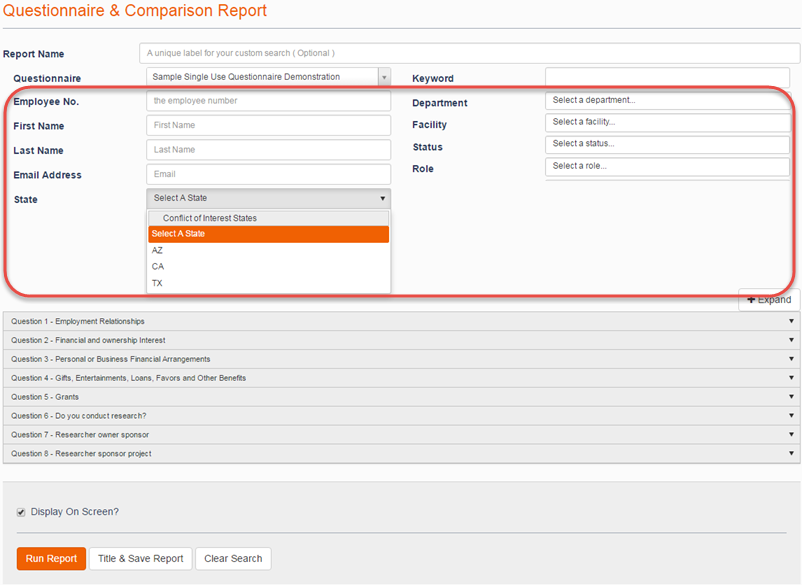
- 'Status' and 'Role' are also filters, but they function in a slightly different manner from the previous fields. Status will allow you to select six of the eight statuses in the system (Excluding Not Started and In Progress), and will show the status you chose in the field. However, if you click the dropdown menu again after selecting a status, you may select another status in addition to the previous choice. This will allow you to include participants with a combination of statuses, such as Approved and Approved with Conditions. Role functions in a similar manner, but the list is based on the roles you have created in the Roles section of the Properties tab.
- Show Me
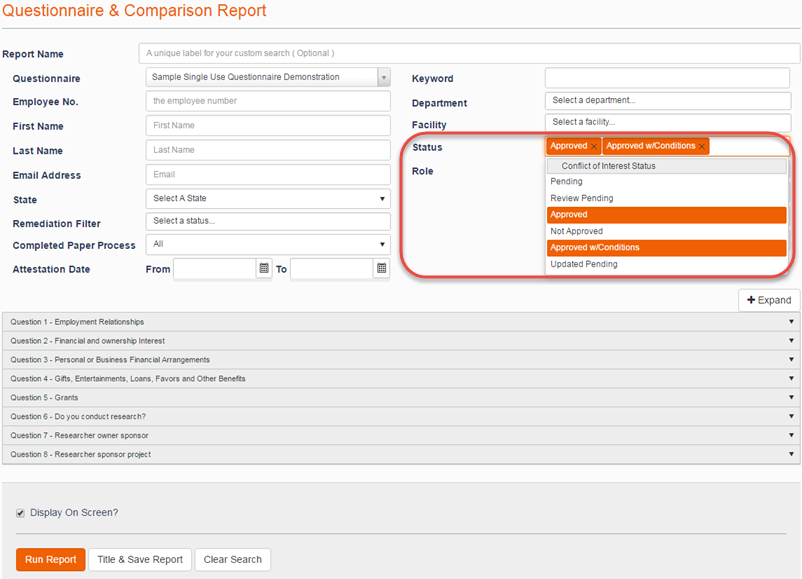
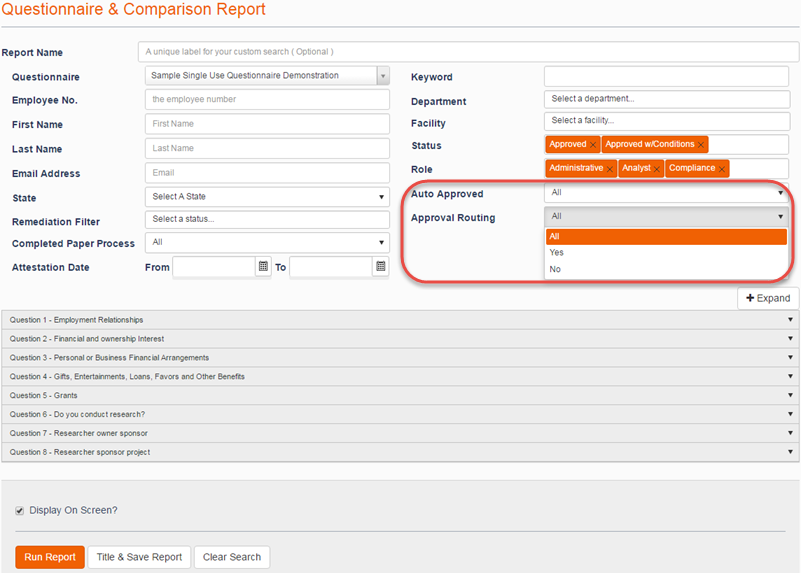
- 'Auto Approved' will search for any participants who were moved to Approved status through auto approval logic. Conversely, 'Approval Routing' will search for any participants who have undergone an approval workflow. (If a participant was auto approved, they will not have an approval routing workflow and vice versa. So, results will never appear when selecting Yes for both filters.)
- Show Me
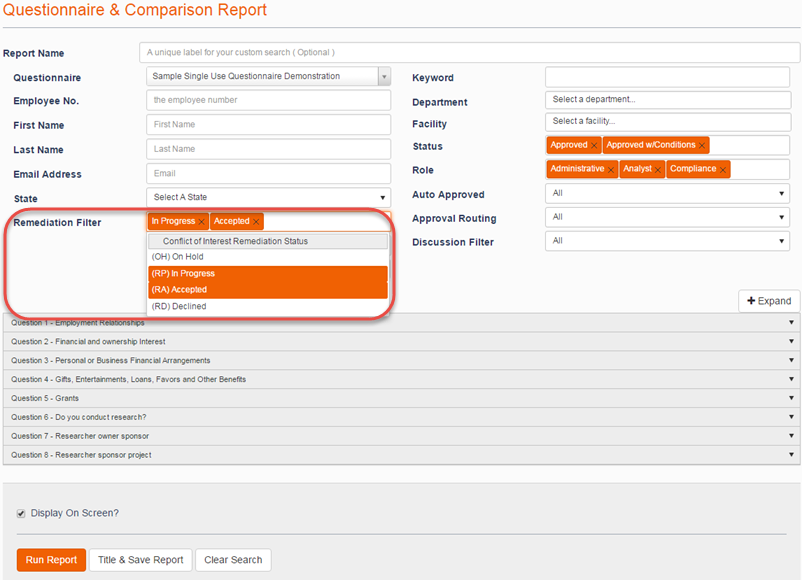
- 'Remediation Filter' will search for participants who are both under a Remediation Plan and match one of the four possible statuses of the remediation plan. Multiple remediation plan statuses may be selected. If a participant falls under one of the selected statuses, their data will be shown.
- Show Me
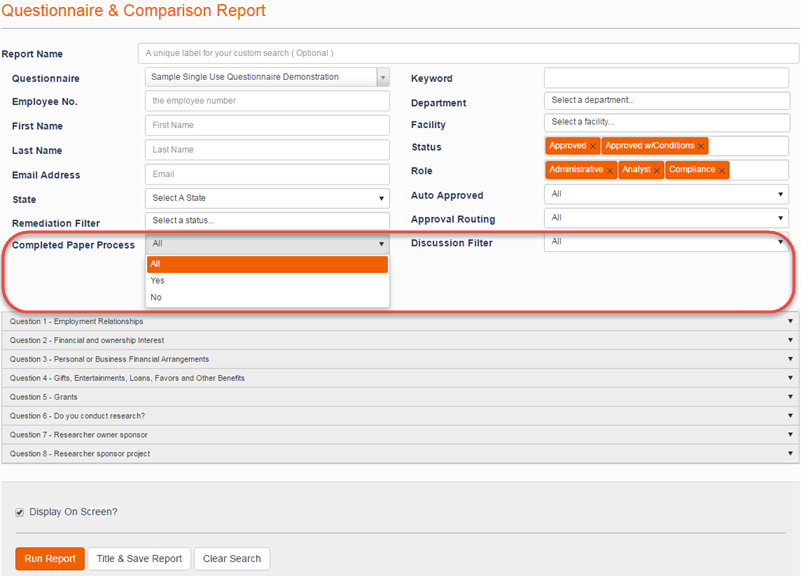
- 'Completed Paper Process' will show any participants who were converted to a paper process. 'Discussion Filter' will search for participants who have a discussion, either active or concluded, under their approval workflow.
- Show Me
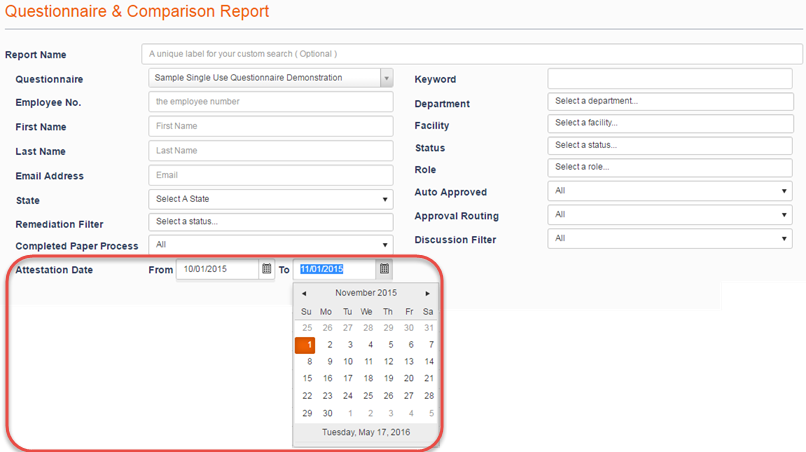
- 'Attestation Date' will show any participants who have submitted their questionnaire responses on or after the From date but before the To date. This will allow you to bring up participants who submitted responses in a given time frame. For example, you could search for all participants who responded to the questionnaire in a past month.
- Show Me
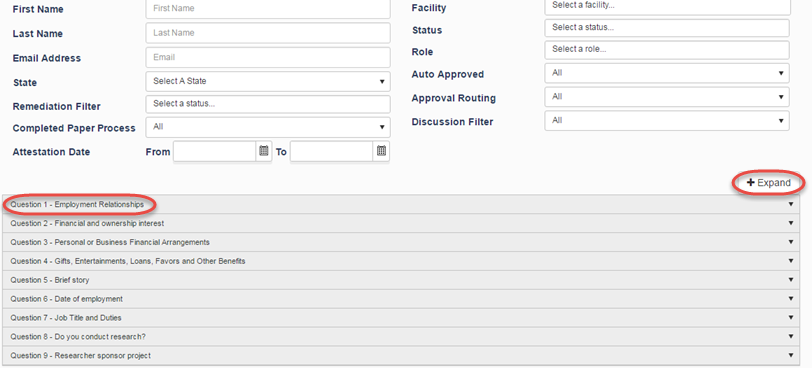
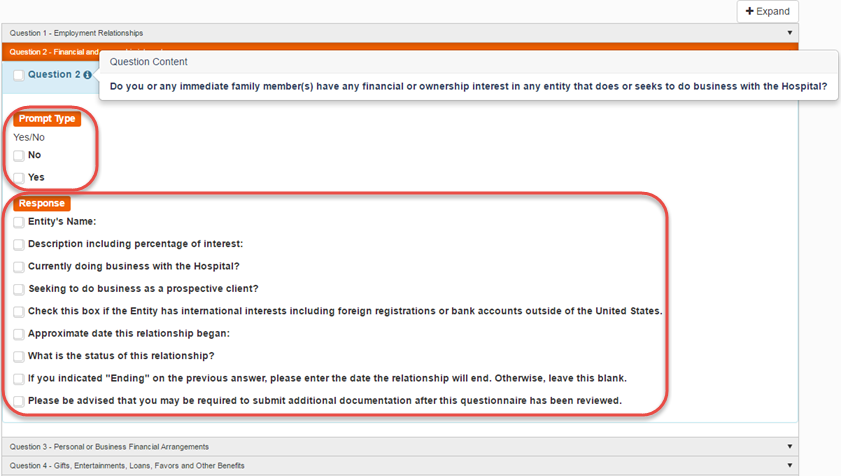
- There are also filters available within each individual question. Click a question to open its individual filter options, or click 'Expand' to open all questions at once.
- Show Me
- Clicking the checkbox next to the question title will filter results to show only that question. Multiple questions may be filtered in this manner. For example, on a ten question questionnaire, clicking the checkbox for questions 3, 5, and 7 will only show data related to those three questions.
(If you are unsure of what the question is, based on the title and synopsis alone, you may hover your cursor over the information icon to view the full question.)- Show Me
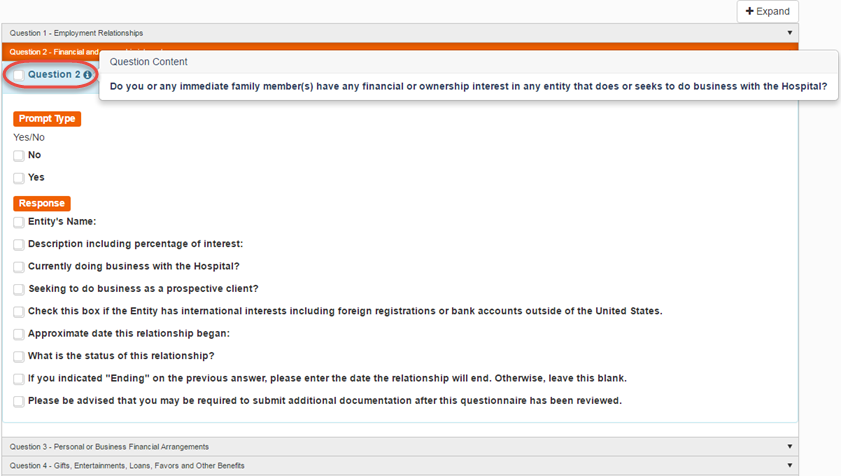
- Clicking a checkbox under the 'Prompt Type' will filter the results to display only matching responses to that prompt type. For example, on a question with a prompt type of Yes/No, clicking the checkbox for Yes will filter the results to display only participants who answered Yes to that question. If the question has Additional Response Fields, they will appear under the Response section. Clicking the checkbox for an additional response will display only participants that answered that response field. You may combine Prompt Type and Response checkboxes to build a specialized custom report looking for specific participant data. (If no participants have answered or responded to a particular prompt type or additional response field, it will not be available as a filter. For example, if you are looking at a Yes/No prompt type question, but there is only a checkbox for No, then that means that zero participants have answered Yes to that question so far, which will gray out Yes and any additional response fields for the question.)
- Show Me
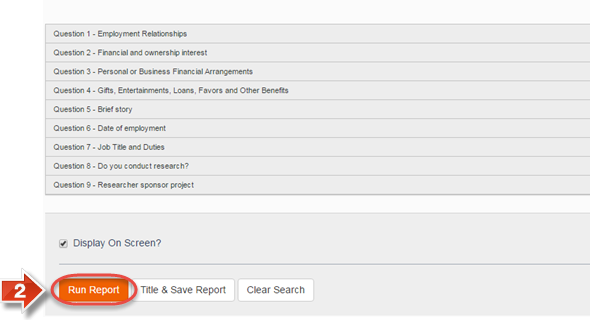
- Below the question and response filters, you will have a checkbox to show results on screen. While this is checked by default, you may uncheck the box if you do not wish for the results to be displayed on the page. Instead, the report will be exported directly to an Excel spreadsheet file. Click 'Run Report' to run the report with the chosen filters. If you wish, you may also click 'Title & Save Report' to retain the report to run again at a later date. (Or, if you wish to start over, click 'Clear Search.')
- Show Me
Show Me How to Use the Custom Report Results
To explore the available functions in the Basic Custom Report, refer to the following steps:
- The Basic Custom Report shows the data from participants’ responses, and allows you to filter and format that data as needed. By default, the results are sorted alphabetically by the 'Last Name' field. If you click the top of one of the columns, it will sort alternatively in ascending and descending order based on that column. (To obtain a spreadsheet of this report, click Export to Excel.)
- Show Me
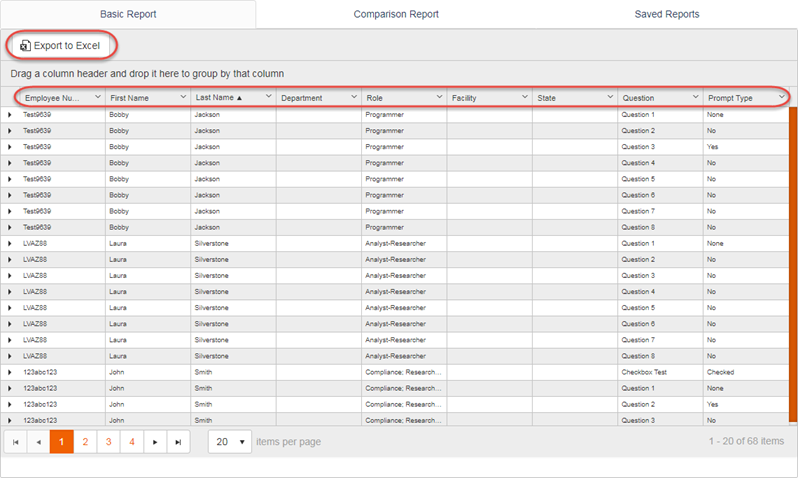
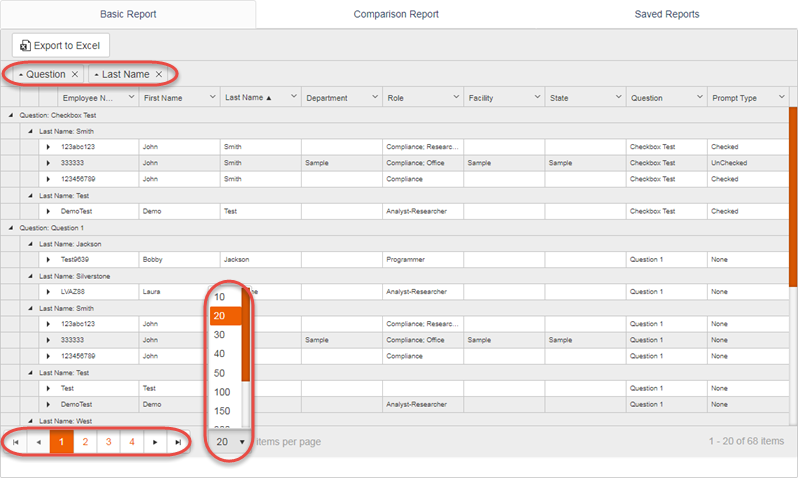
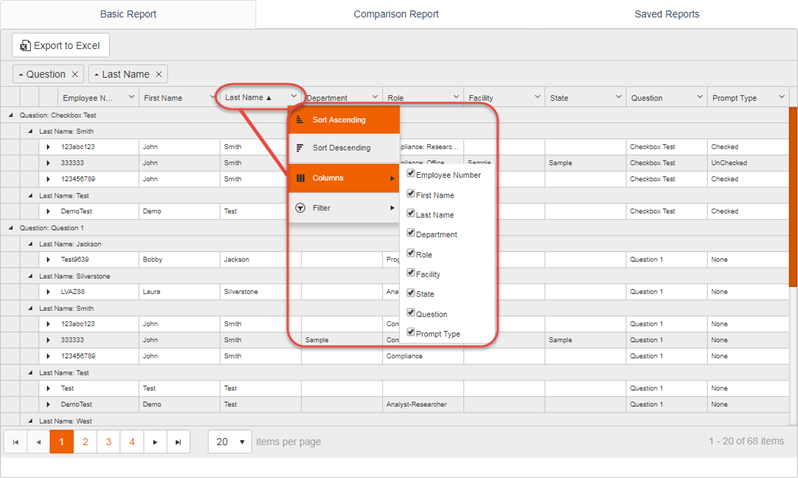
- You may also click and drag one of the column headers to the top left of the results list, which will create grouping criteria. Rather than a simple sort, this will have group headings for each of the columns dragged in this way. This makes it much easier to change the viewing format of the report. Please note that any grouping that was done will not be preserved in the Excel spreadsheet. In the example below, the report was grouped first by Question, and then by Last Name. This means that the first header for each section of the report will be based on the question, followed by the answers being sorted by the last name of the participant. At the bottom of the list, you may also change between multiple pages of the participant results list, as well as configure the number of results per page that will appear.
- Show Me
- Each column also has its own list of available filtering options. The previously mentioned Sort options, Ascending and Descending, are available on this menu. In addition, the 'Columns' option will allow you to remove columns currently on the report by unchecking the box beside the column name.
- Show Me
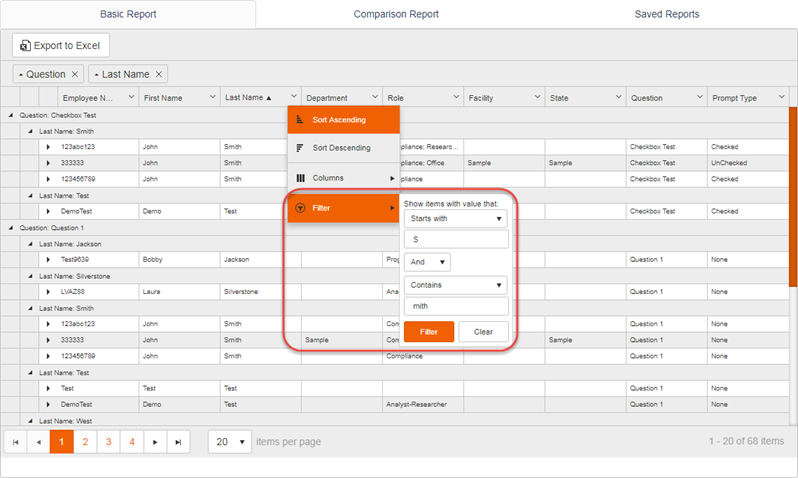
- There is also another 'Filter' option for each column. Using the filter, you may search for results that Contain, Equal, Start With, Do Not Contain, Do Not Equal, or End With the entered text. Two separate filters may be combined or processed separately by selecting And/Or on the dropdown separating the two filters. For example, under the Last Name column you could filter by Starts With “A”, and then display only participants whose last name begins with a letter A. Or, if you wanted to narrow results down to only participants with a combination of two specific roles, under the Role column you could filter by Contains “Administrative”, select And, then in the second filter select Contains “Compliance”. The report would then filter down to show only participants with both the Administrative and Compliance roles on their profile. (To remove any existing filters from a column, click 'Clear'.)
- Show Me
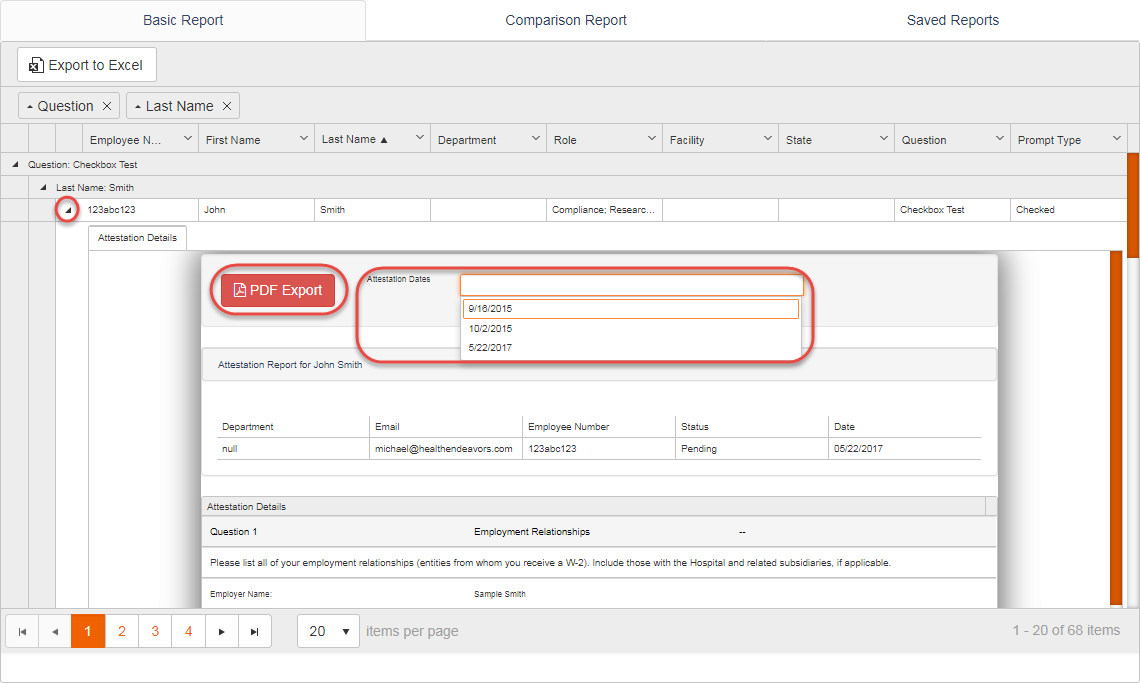
- To view more detailed information about a participant, click the arrow icon to the left of their data. The subsection that is revealed contains the entire attestation report log for the participant. Whether the participant has submitted their questionnaire once or multiple times, each instance will be available for viewing in this subsection. Clicking PDF Export without selecting anything else will create a PDF report with all of the participant’s attestation reports. However, you may also select specific attestation reports using the dropdown menu to select one or more Attestation Dates. This will filter the report on-screen, and the PDF Export as well.
- Show Me
Show Me How to Run a Comparison Report
To run a comparison custom report, perform the following steps:
- After running a basic custom report using the process outlined above, click on Comparison Report. (If there are no participants with multiple attestations, the Comparison Report will not be available. It will appear once a participant has submitted their questionnaire responses more than once.)
- Show Me
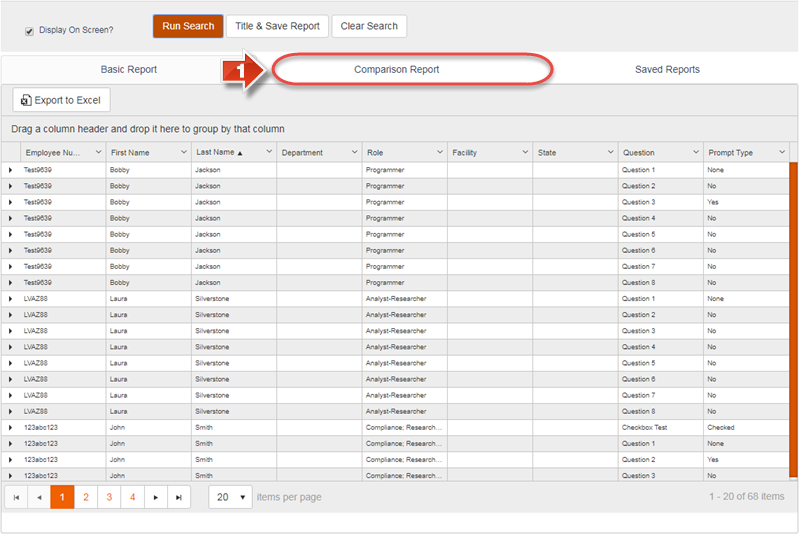
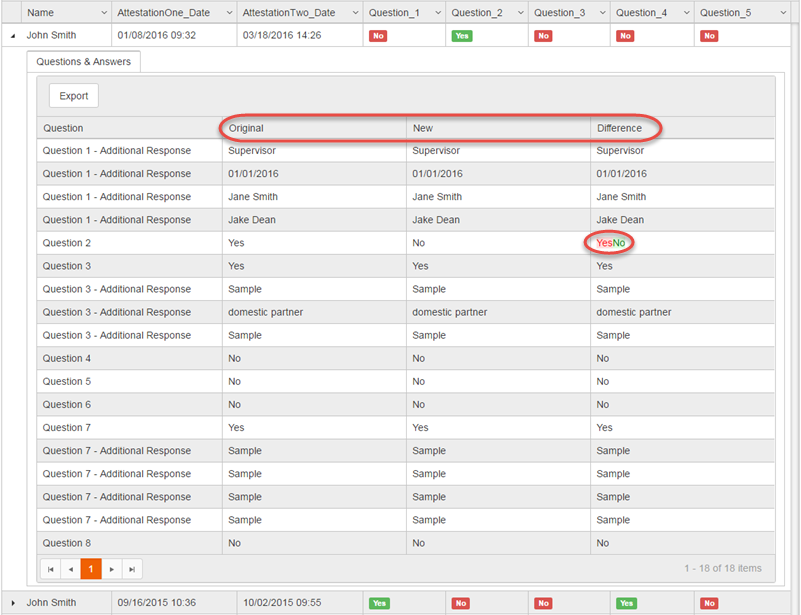
- The Comparison Report will show all participants who have submitted multiple attestations. It will directly compare their most recent attestation to the previous one, and indicate whether there was a change on each specific question. If there is a No for a question, it means there was no change, whereas Yes indicates there was a change. To view more detailed information about a single participant’s comparison report, click the arrow icon to the left of the participant.
- Show Me

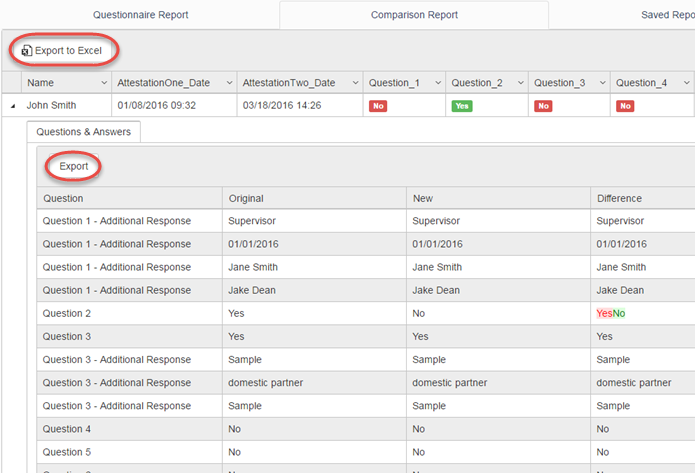
- Each of the participant’s responses will be shown, question by question, with additional response fields directly below the parent question where applicable. The Original column shows the previous answer, and the New column shows the newest answer. The third column, Difference, will merge both answers, showing the old response in red font, the newest in green, and leaving unchanged response data without coloring.
- Show Me
- If you would like to put the entire comparison report to a spreadsheet, click the Export to Excel button at the top of the participant list. If you would prefer to have spreadsheet data on a specific participant, click the Export button at the top of their individual report.
- Show Me
- Example

Show Me How to Run a Saved Report
To load a saved custom report, perform the following steps:
- If you saved any reports using 'Title & Save Report', the Saved Reports section becomes available at the bottom of the custom reports page. To start, click on 'Saved Reports'.
- Show Me
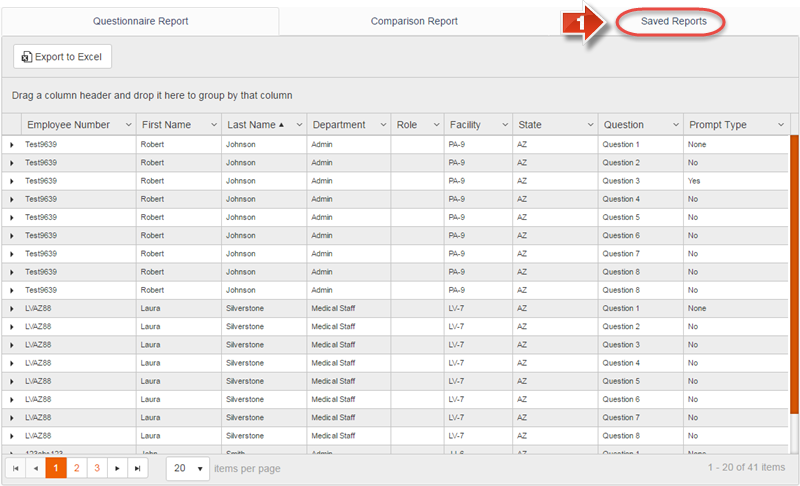
- To open the saved report, click the 'Edit' button. This will load all of the saved report settings into the custom report interface. You may then edit the saved report as needed, or click 'Run Report' immediately to re-run the report.
- Show Me

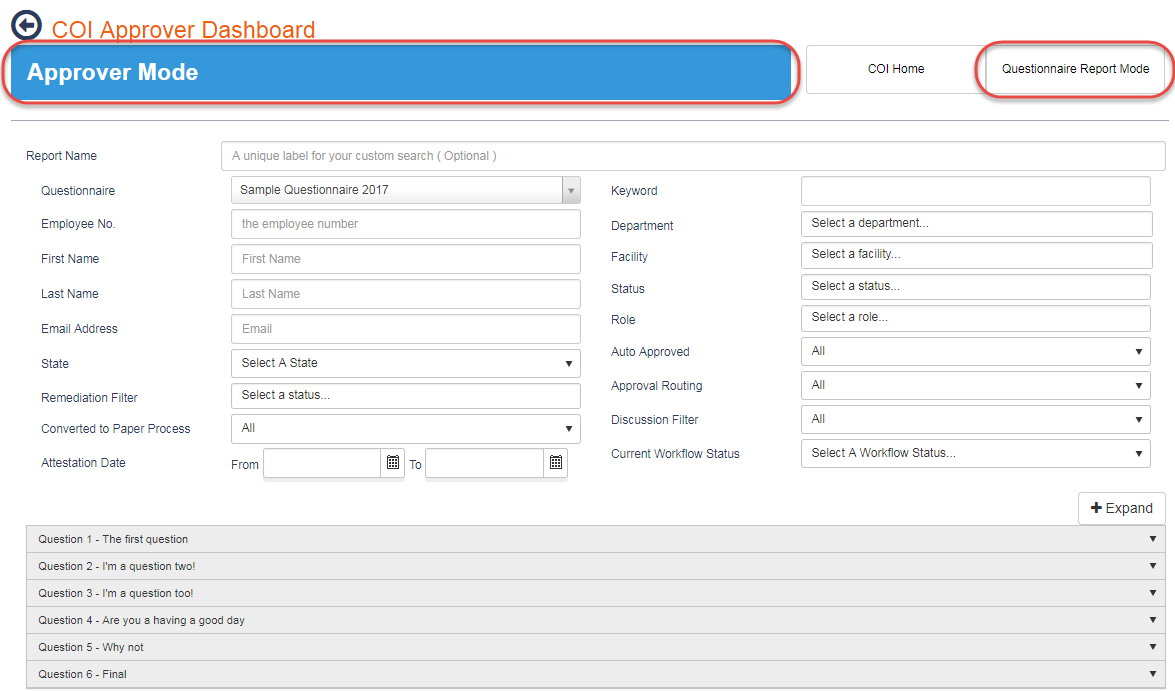
Did you know: The Custom Reports page has two modes: Admin Mode, shown in this section, and Approver Mode. Approvers that utilize the approver dashboard also go to the Custom Reports page, but they enter approver mode to process participants. For users that are both approvers and administrators, there is a tab at the top of the page that allows you to switch between these two modes.
Show Me
Related articles
-
Page:
-
Page:
-
Page:
-
Page:
-
Page: