ACO QM Deep Dive
Use the processes outlined here to move about the QM 2020 software and perform some basic actions related to patient quality metrics research and management.
Step-by-step guide
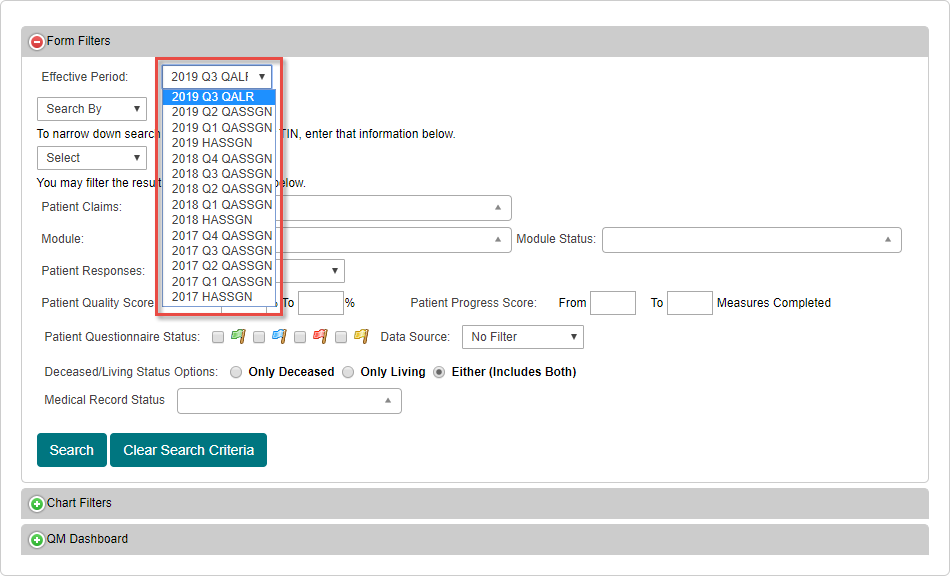
- The first drop-down under the Form Filters section allows you to select the Effective Period for the tool to use. It defaults to the most recent period for the current year. However, it can be updated to use previous effective periods. This changes the attributed patient population to that of the chosen effective period and will also map which providers those patients are assigned to.
The first search filter under the Form Filters section allows you to search for patients by using one of several patient profile attributes. For every profile attribute, except for DOB, you may enter alphanumeric characters to search for. In addition to the text, you must decide the circumstances in which to use the filter. There are three options. (But for DOB only a specific date may be entered.)
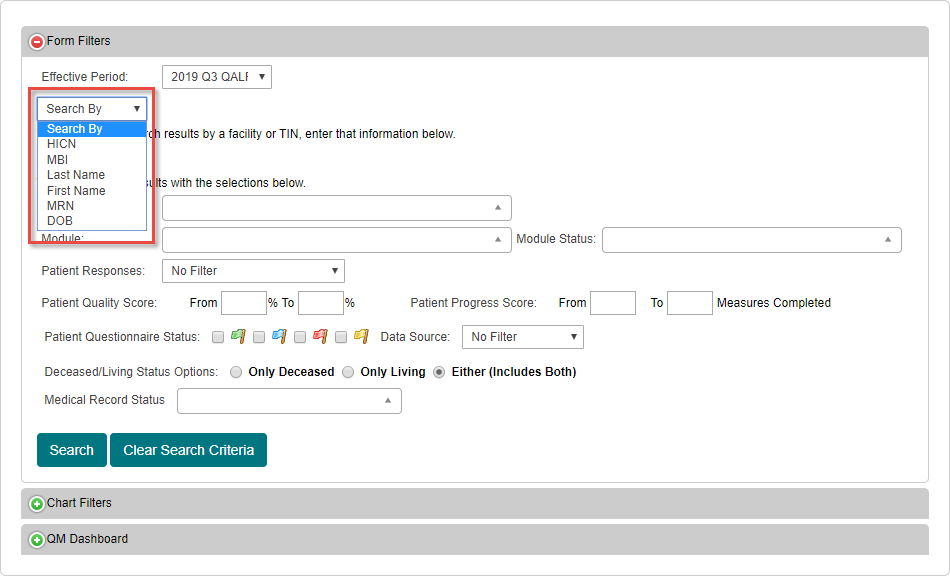
Patient Profile Attributes:
HICN – Search for patients based on their Health Insurance Claim NumberMBI – Search for patients based on their Medicare Beneficiary Identifier
Last Name – Search for patients based on their last name
First Name – Search for patients based on their first name
MRN – Search for patients based on their Medical Record Number
DOB – Search for patients based on their Date of Birth
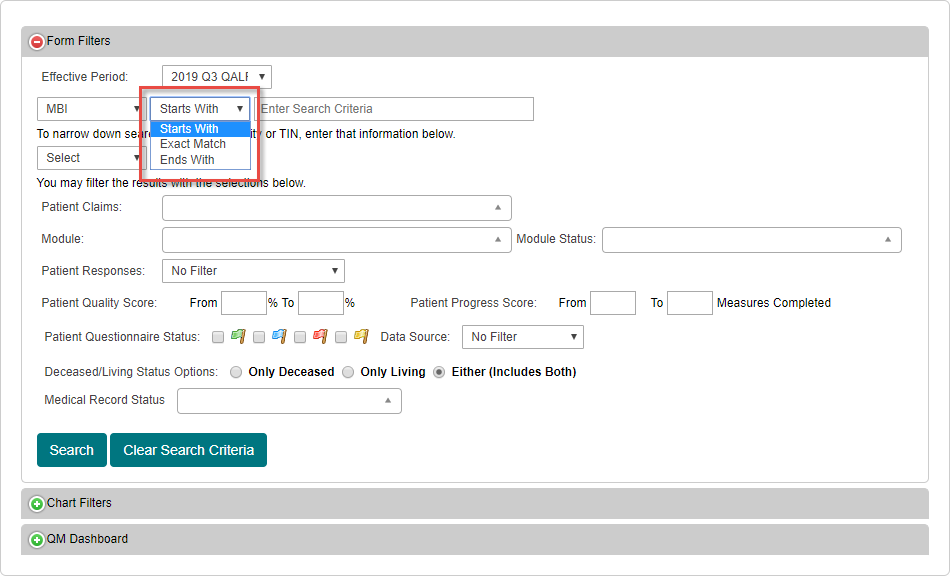
Search Type Definitions:
Starts With – Searches based on patient data that begins with the text entered
Exact Match – Searches based purely on patient data that is identical to the text entered
Ends With – Searches based on patient data that ends with the text entered- The next search filter pertains to TIN and Facility information. Rather than the patients themselves, this search filter uses the patient’s primary TIN or facility within your organization. There are three options as seen in the previous step. (However, Facility Division is pulled directly from the list of divisions within your organization, where one or more may be selected to filter by.)
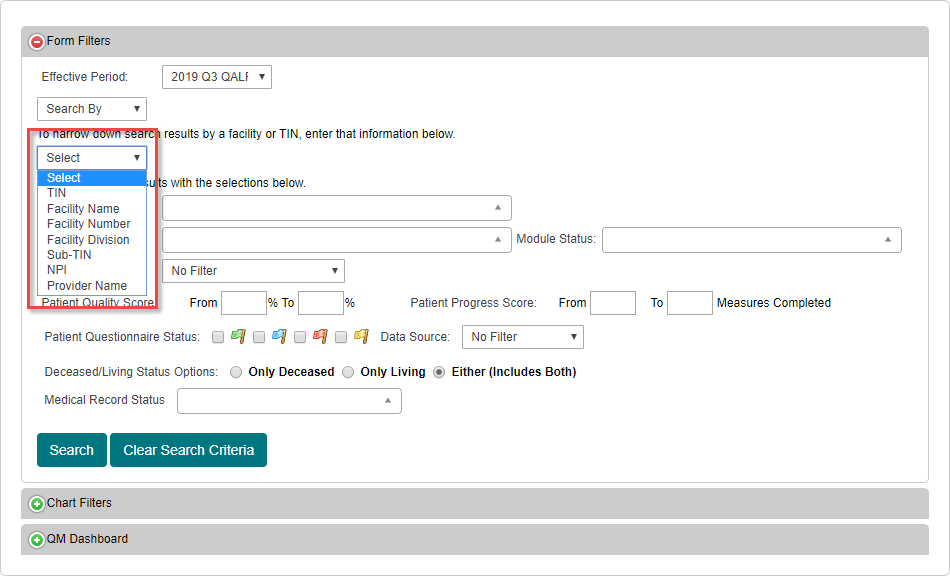
TIN – Searches for patients based on the Taxpayer Identification Number of the practice to which they belong
Facility Name – Searches for patients based on the name of their associated care facility
Facility Number – Searches for patients based on the facility number of their associated care facility
Facility Division – Searches for patients based on the selected division within your organization
Sub-TIN – Searches for patients based on the Sub-TIN of the practice to which they belong
NPI – Searches for patients based on the National Provider Identification Number of the provider to which they belong
Provider Name – Searches for patients based on the name of the provider to which they are assigned in the Health Endeavors database
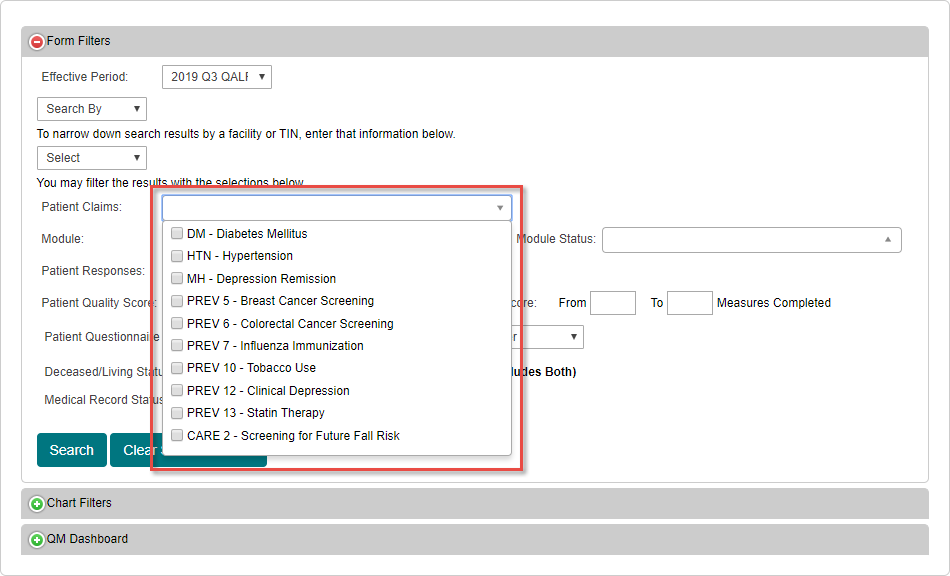
- The Patient Claims section of the search filters pertains to patient claims data relevant to the quality measures responses. Multiple measures may be selected in this filter, and patients with claims data in at least one of the selected measures will be included in the search results.
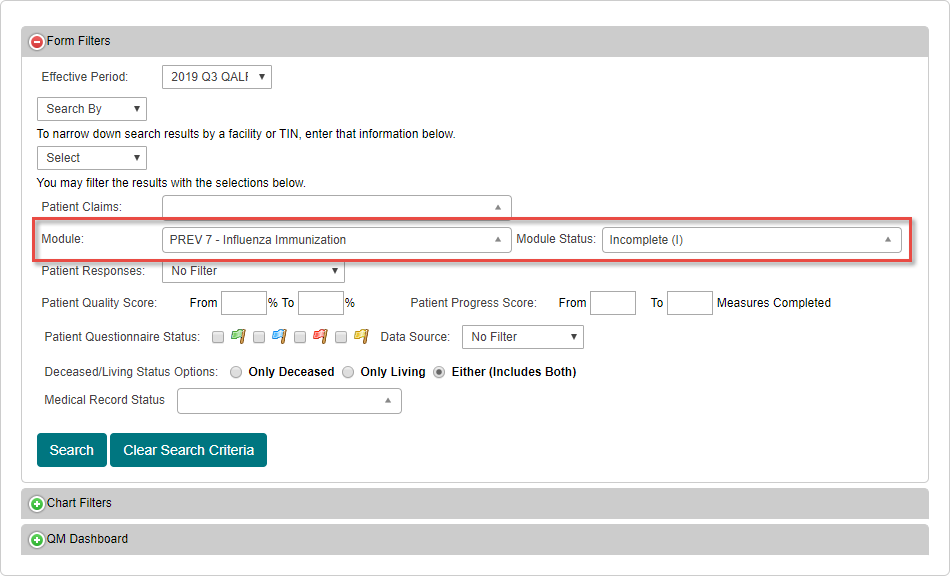
- The Module and Module Status sections of the search filters also pertains to quality measures. However, these filters will narrow the patient list search results based on patients with response data matching the choices in the 'Module Status' section for the quality measures chosen in the 'Module' section. (In the example below, all patients without response data for the PREV-7 quality measure would appear on the search results.)
Status Definitions:
Complete (C) - Patient response to this quality measure is complete with a performance responseComplete with Non-Performance Answer (CNP) - Patient response to this quality measure is complete with a non-performance response
Exception (Medical, Patient, System Reason) (E) - Patient response to this quality measure is exempt due to specific response circumstances
Skipped (S) - Patient does not qualify for this measure based on measure-specific restrictions such as age or gender
Incomplete (I) - Patient response to this quality measure has not been submitted
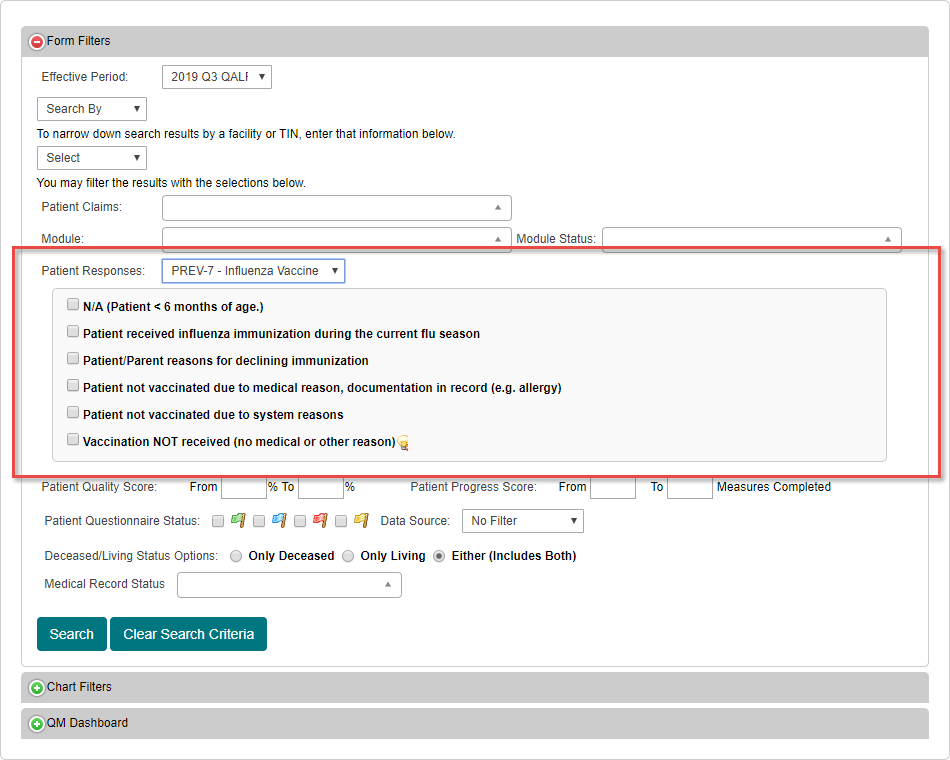
- The Patient Responses section allows the selection of one measure. Once the measure is chosen, any potential responses to the specific measure are generated. Any patient with one of the selected responses for that measure will appear in the search results. In the example below, a list of patients will be generated who currently have a non-performance response to quality measure PREV-7.
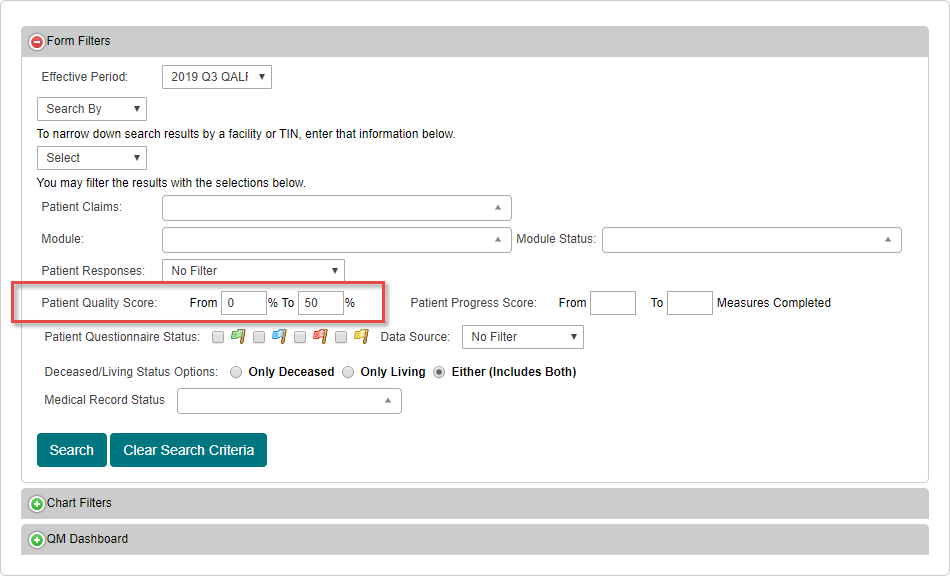
- The Patient Quality Score search filter shows patients with an overall quality measure score between the two percentages entered. This can be useful under numerous circumstances. In the example below, this field is being used to show all patients with a performance score between zero and fifty percent, helping to prioritize patients with lower scores.
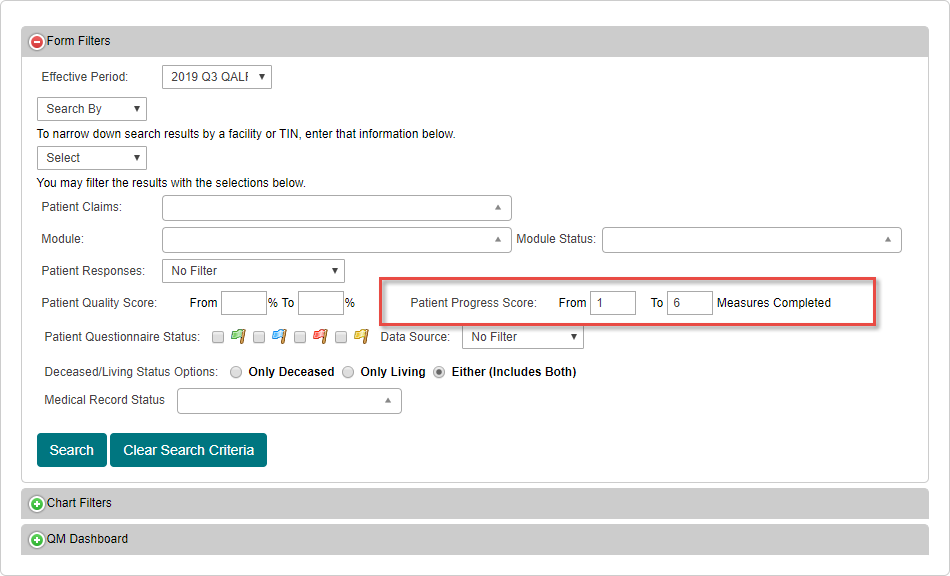
- The Patient Progress Score search filter shows patients whose completed measures fall between the two values entered. Like the Patient Quality Score, this can have a variety of uses, but is particularly useful for finding patients with few or no quality measures completed. In the example below, patients with response data for anywhere between 1 and 6 quality measures would be displayed.
- The Patient Questionnaire Status search filter shows patients whose overall questionnaire has one of the four primary statuses. More than one status can be selected, and will display patients with one of the selected statuses.
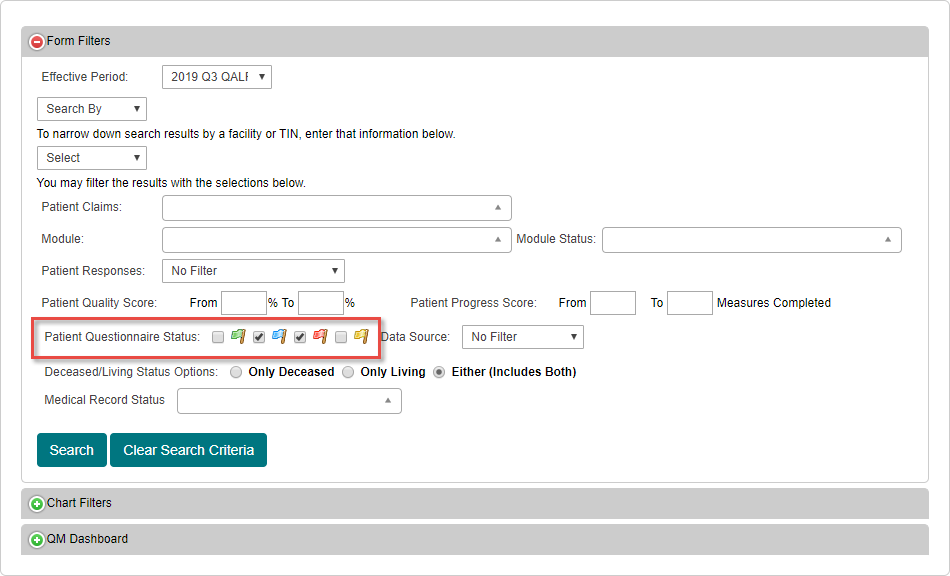
Flag Color Definitions:
Green – The patient’s questionnaire has been Completed
Blue – The patient’s questionnaire is In Progress
Red – The patient’s questionnaire is Not Started
Yellow – The patient’s questionnaire has been Skipped - The Data Source search filter shows patients with measures that have been filled out through one of several different methods.
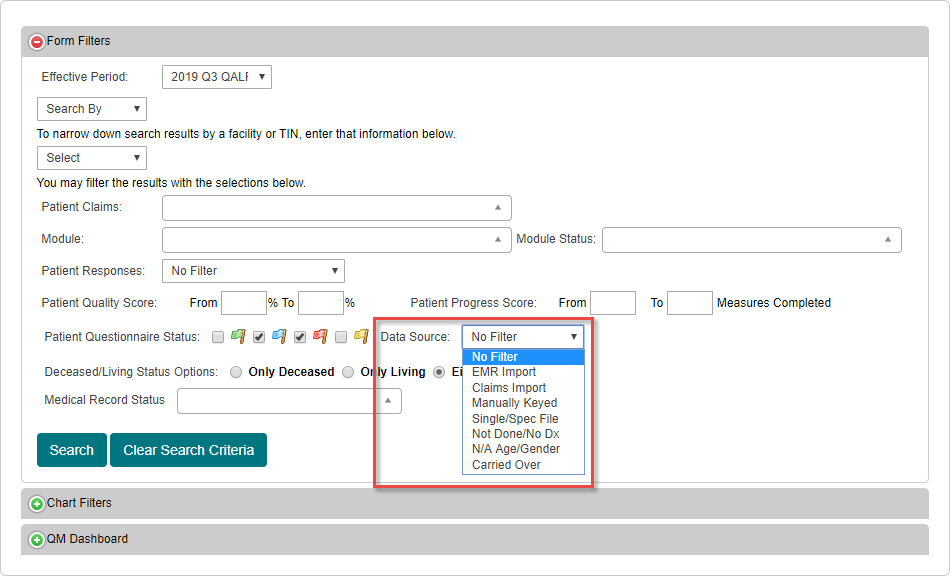
Data Sources:
EMR Import – Searches for patients with one or more measures answered by an EMR file, a large import file that is imported via a specialized back-end process
Claims Import – Searches for patients with one or more measures answered by a CCLF claims file from CMS. Eligible measures are automatically answered in this way based on claims data for the patient
Manually Keyed – Searches for patients with one or more measures answered manually by a user within the system
Single/Spec File – Searches for patients with one or more measures answered using either Single or Spec File spreadsheet uploads in the system
Not Done/No Dx – Searches for patients with one or more measures filled in as either non-performance or no diagnosis. This is often due to an absence of response, and is usually replaced by a true answer or data at a later time
N/A Age/Gender – Searches for patients who were skipped in one or more measures based on age or gender disqualificationsTwo of the Data Source search filters, EMR Import and Single/Spec File, have additional parameters. The Import Date From field narrows down the range of possible files based on the dates entered. Import Files lists all files that were placed into the system during that date range and allows you to select one.
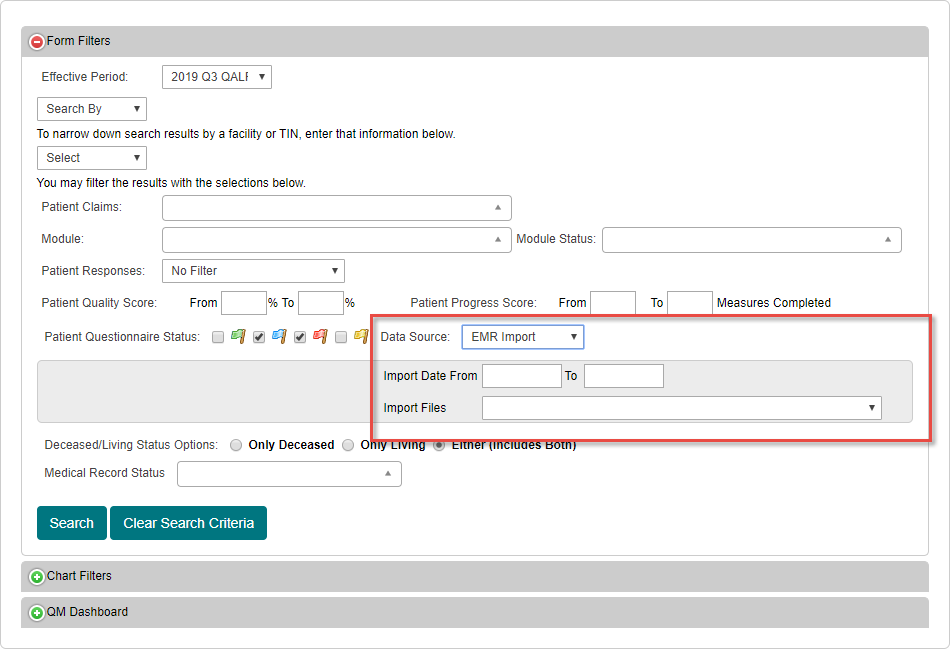
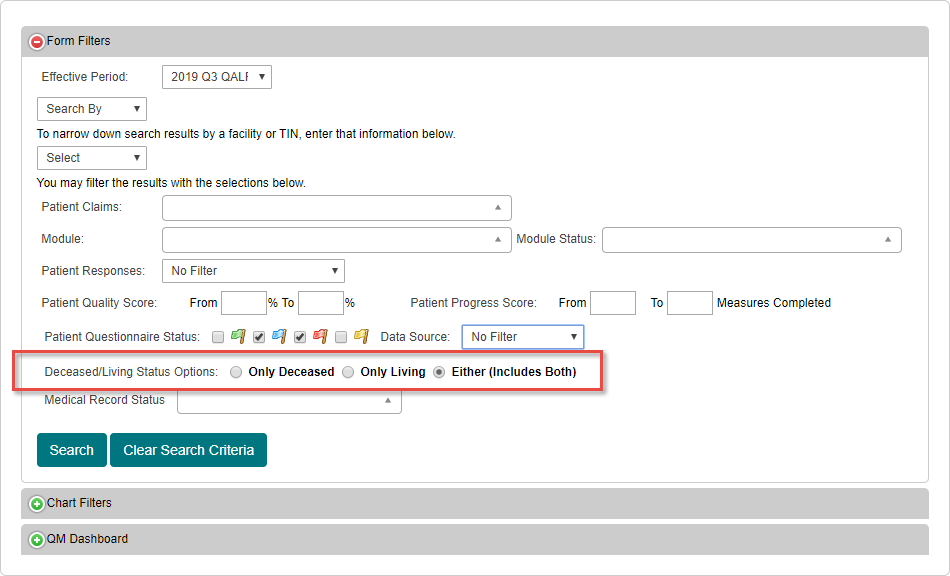
- The Deceased/Living Status Options search filter will show patients that are in the system as either alive or deceased. By default, both are selected.
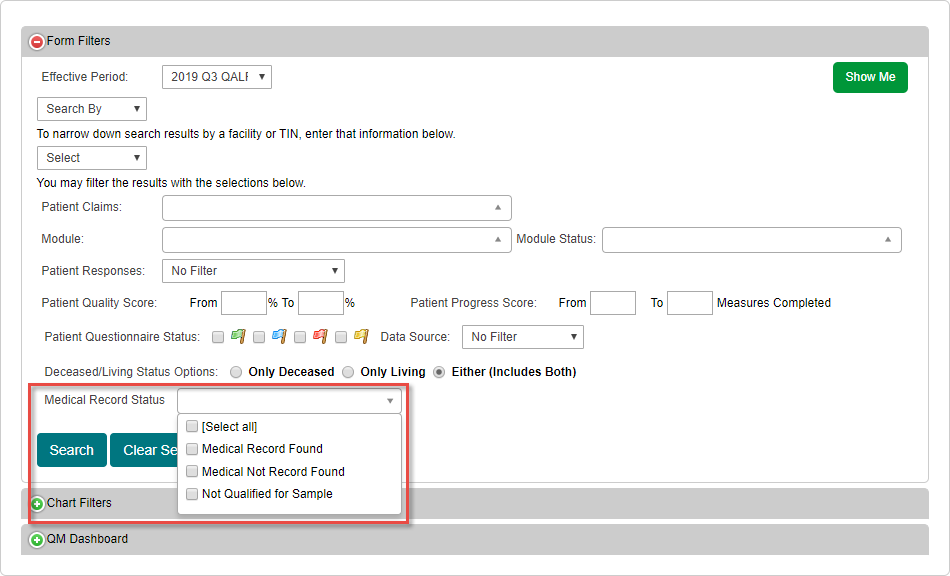
- The Medical Record Status search filter allows you to filter results based on the availability of medical records for patients, or allows for the filtering of just patients who are not qualified for sampling.
- Once the desired search filters are selected and configured, click the Search button to generate results in the patient list. Alternatively, click Clear Search Criteria to remove all selected filters and start the search form anew.
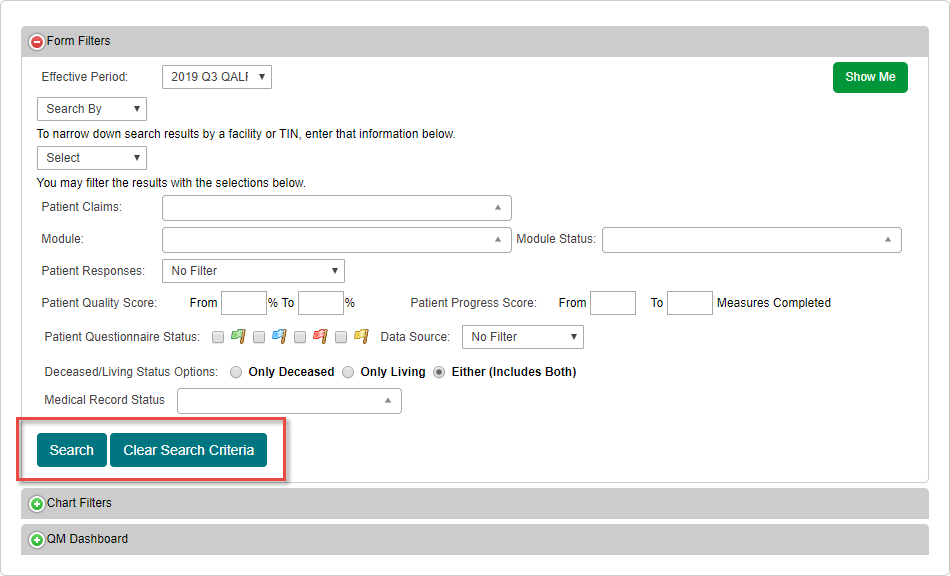
Upon searching, the patient list below the filters section will populate based on the search criteria used.
- The Chart Filters section may be found directly below the patient search filters. This chart shows your company’s current progress based on a ratio of responses for each measure. The bars in each row, when added together, total 100% for each of the quality measures.
- Show Me
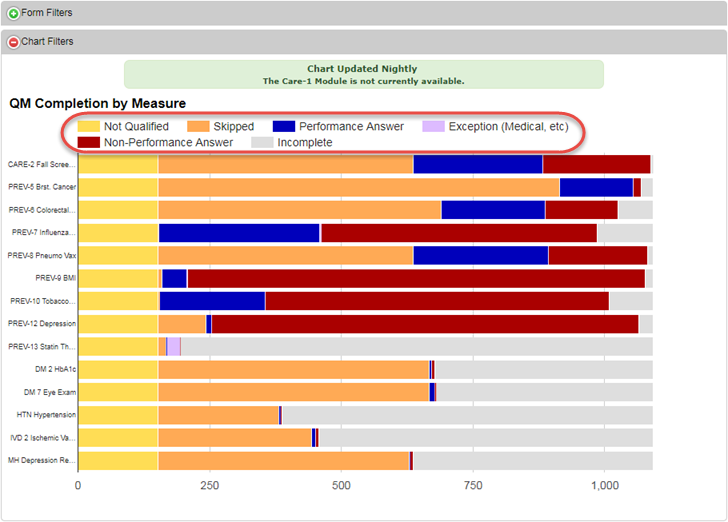
A Yellow Bar indicates patients that are Not Qualified for the measure
An Orange Bar indicates patients for whom the measure is Skipped/Non Applicable (N/A)
A Blue Bar indicates patients with a Performance Answer for the measure
A Lavender Bar indicates patients with an Exception/Exclusion for the measure
A Red Bar patients with a Non-Performance Answer for the measure
A Gray Bar indicates patients for whom the measure is currently Incomplete
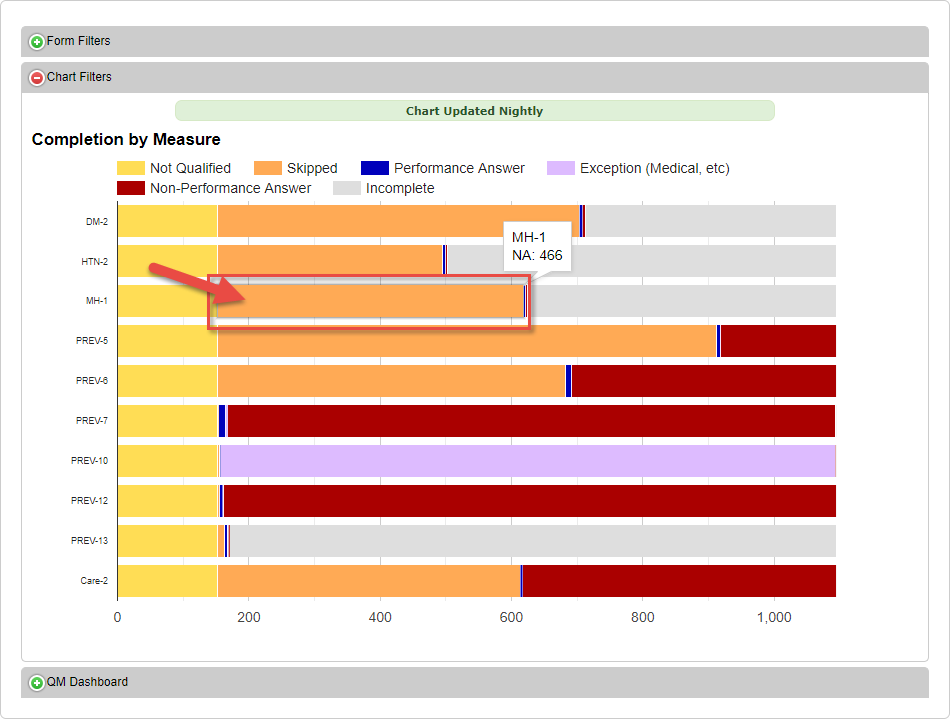
- Highlighting one of the bars will pop up a small text box that indicates the measure, the type of response being measured, and the current number of patients in that response type. This also indicates the percentage of total patients for the measure that this response encompasses. Further, there is a filtering option available based on this response. To see this filter, click the colored bar itself.
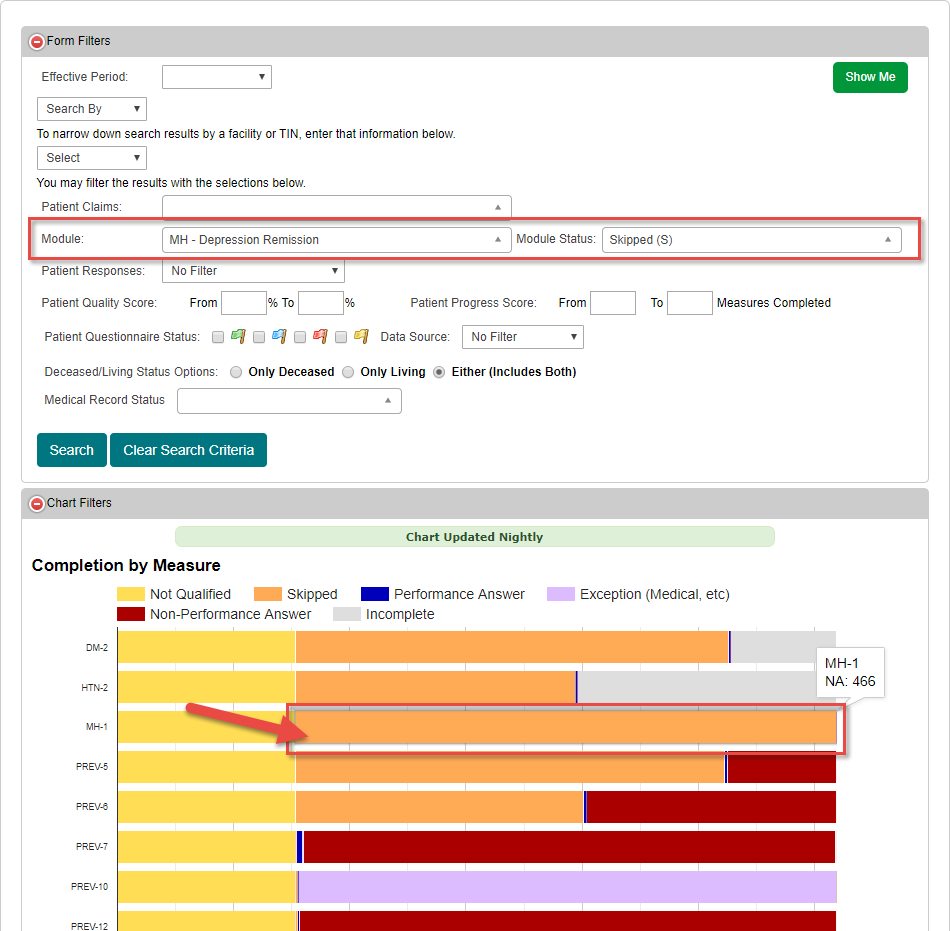
- After clicking the bar, the search filters are adjusted so that the patient list displays the patients that comprise that section of the chart. This allows you to view only patients that make up the section of the chart that you previously clicked. (The chart is updated nightly. If changes have been made over the course of the day, please check the following day for an updated reflection in the chart.)
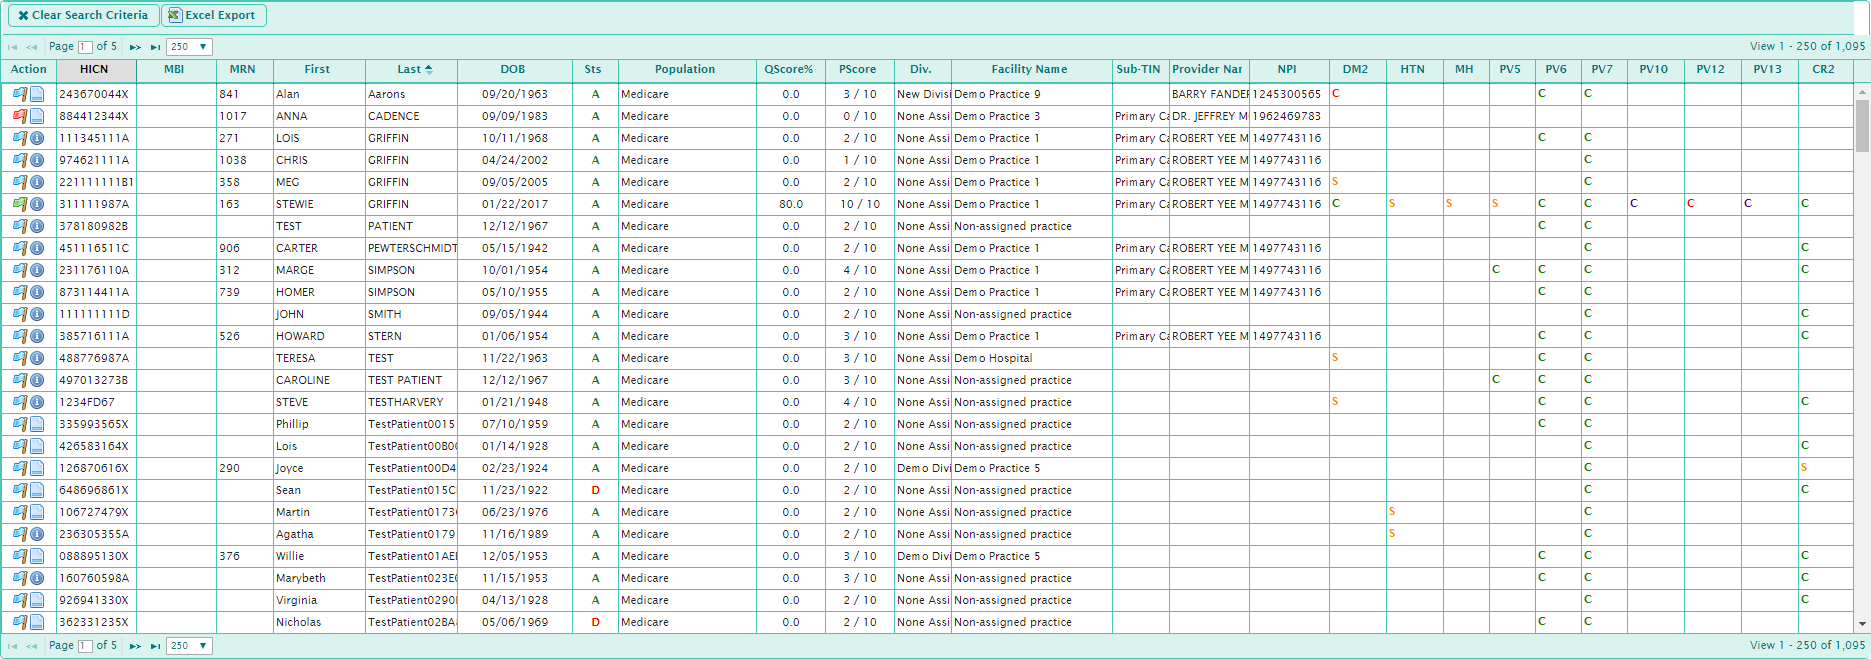
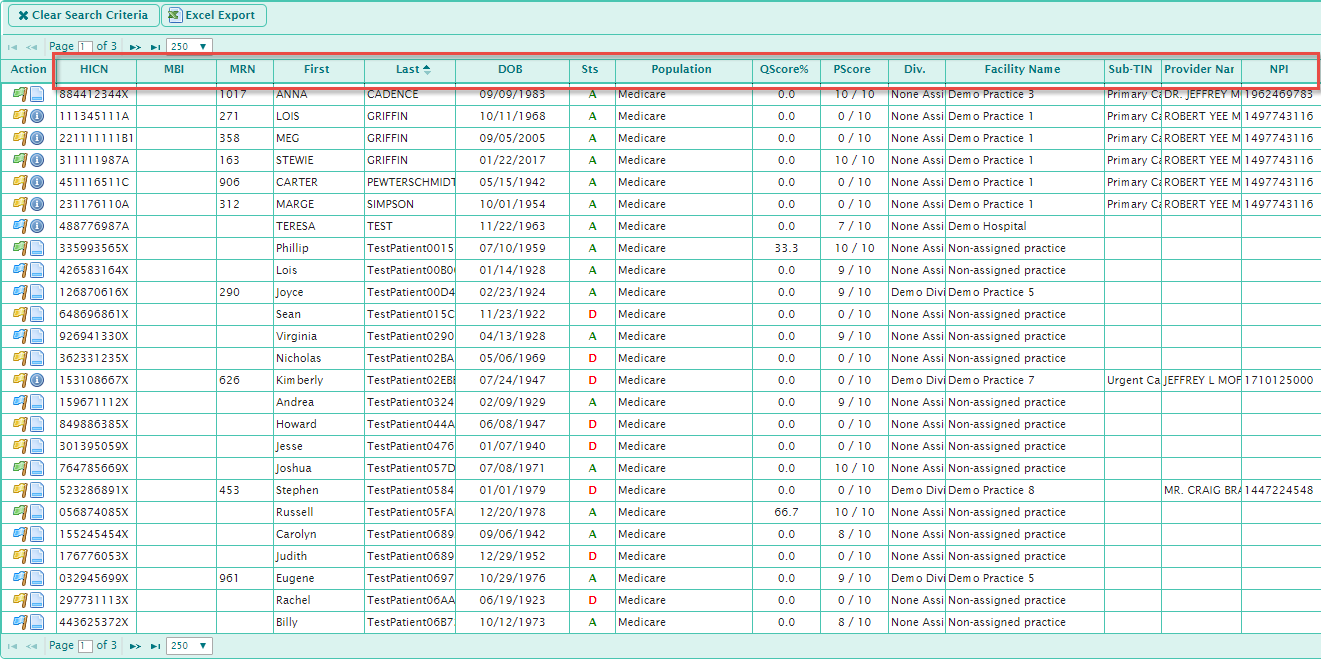
- The patient list can be found directly under the search and chart filters on the QM 2018 page. By default, all accessible patients are displayed. As filters are used, the list will become more specialized. The first half of the patient list shows all basic information. This includes the patient’s HICN, MBI, First and Last name, Date of Birth, living Status, patient Population, current Quality Score percentage, current Progress Score, as well as the Division, Facility Name, Sub-TIN, Provider Name, and NPI to which the patient is assigned. At the top of the patient list window, there are two buttons. Clicking Excel Export will send a request for a QM Questionnaire Report. This report is not generated immediately, but instead appears just below the Chart Filters section after the request is completed. Clicking Clear Search Criteria will remove any search filters and show all available patient data.
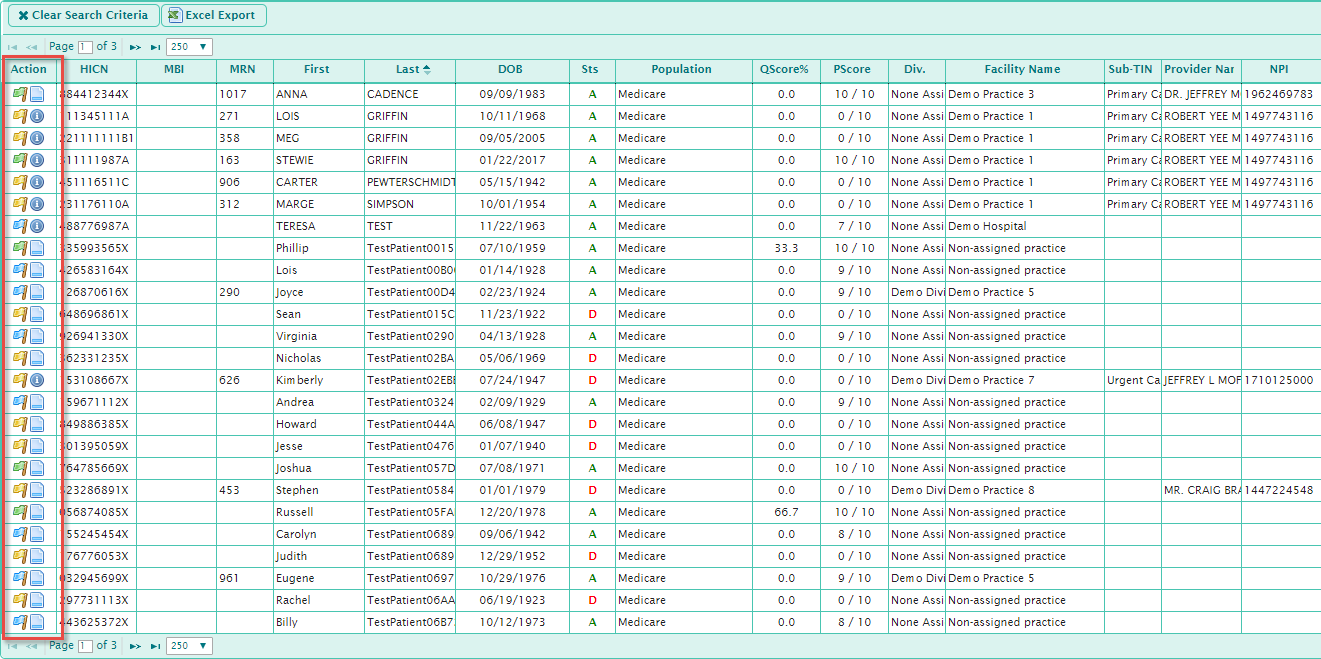
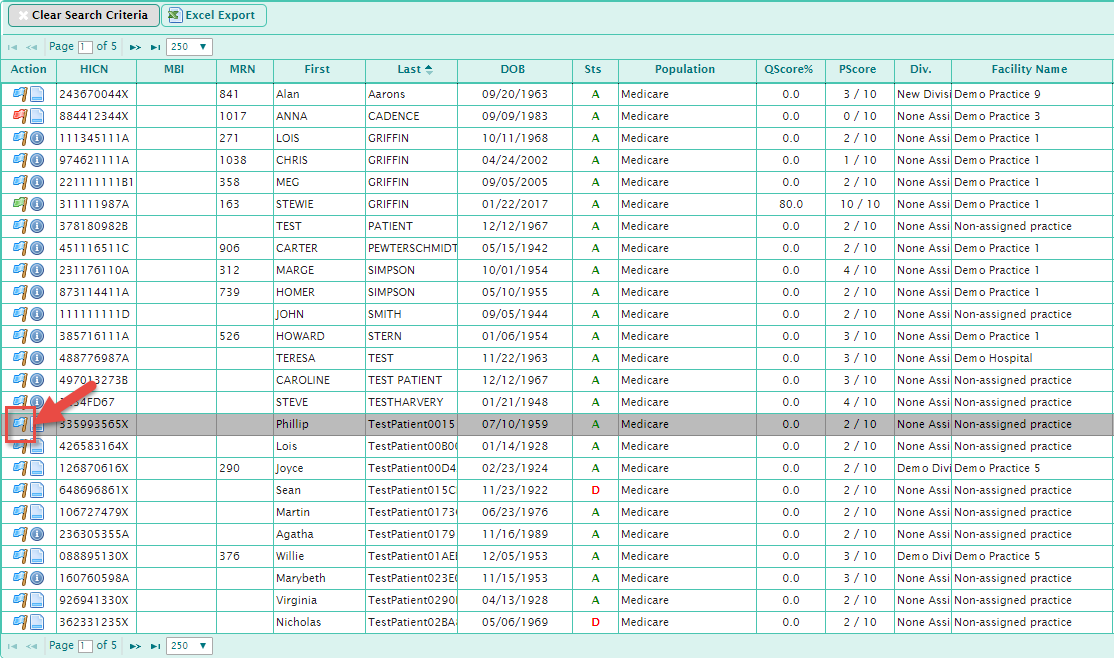
- The far left column of the patient list also contains links to two other sections: The right icon, which is either a blue circle or a blue notepad, leads to the patient chart and claims data window. The left icon, a colored flag, leads to the quality measures questionnaire page.
- The patient list also contains a summary of current quality measure data on the right half of the table. If a patient has quality measures data, a colored letter symbol will be filled in for that measure.
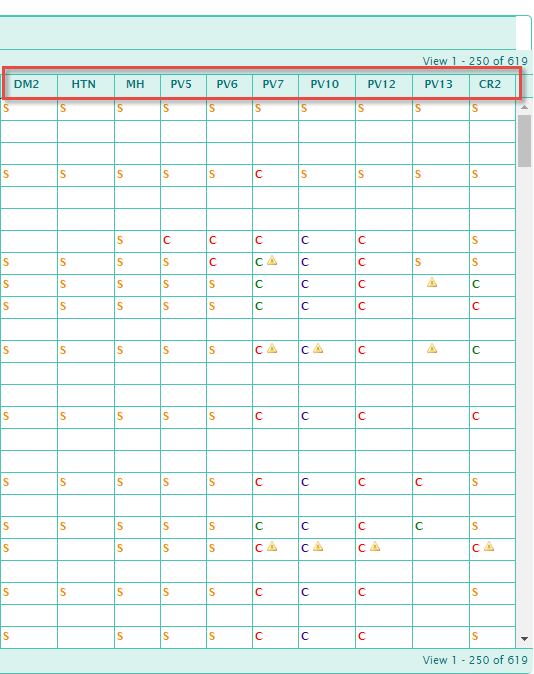
A Red C indicates that the patient has a non-performance answer for this measure
A Green C indicates that the patient has a performance answer for this measure
A Blue C indicates that the patient has an exception that is not scored for this measure
A Yellow S indicates that the patient’s measure was skipped, usually due to non-applicability from age or gender
Any measure that has an adjacent triangle with an exclamation point in the middle ( ) also has claims data to accompany that specific measure
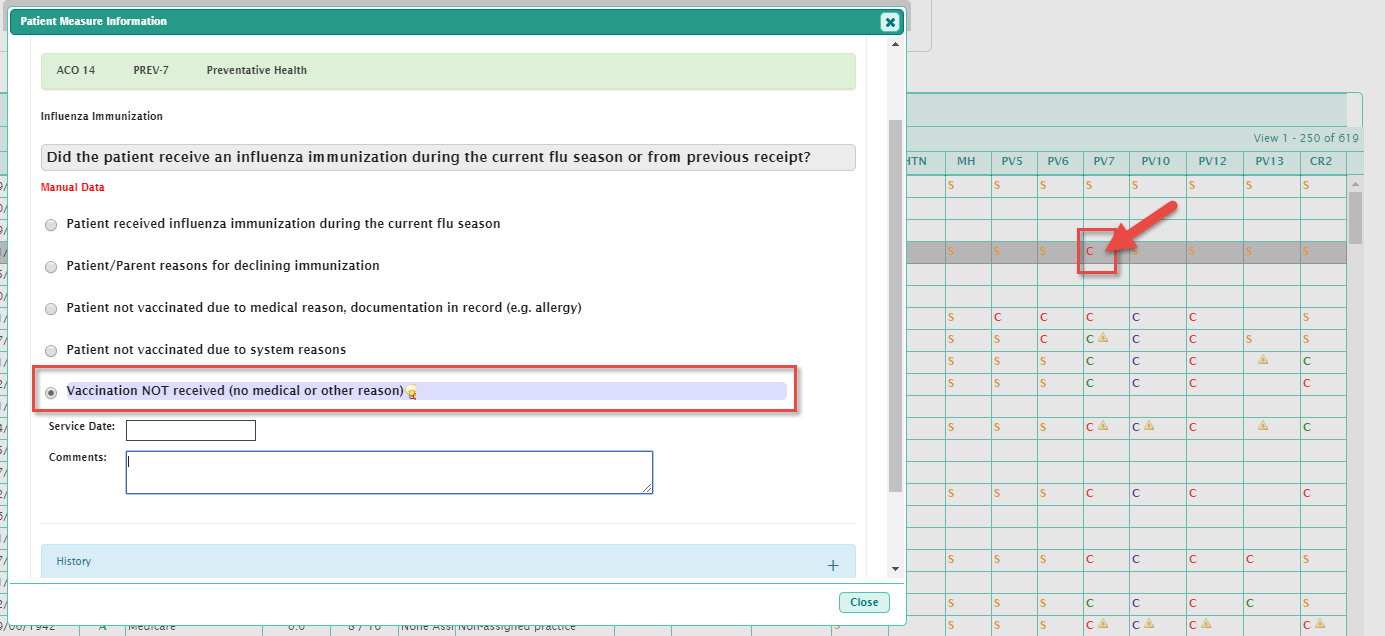
 - As an alternative to visiting the questionnaire page, clicking the space for a patient’s measure will open up a new window containing that measure. If an answer is already filled in, the information will be available for viewing on this window. If you wish to manually key the information for the measure, you may fill in a response and click Update Measure.
- Find the patient you wish to access in the patient list, and click the colored flag in the 'Action' column.
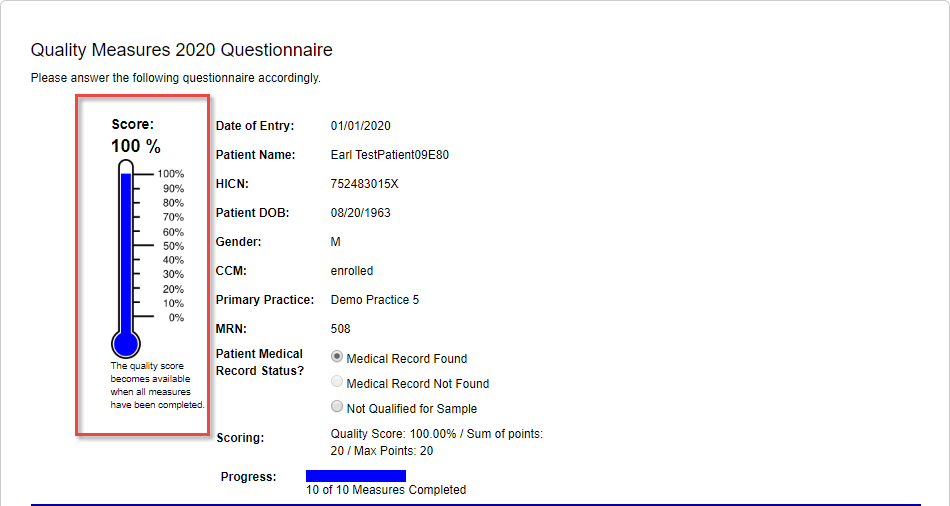
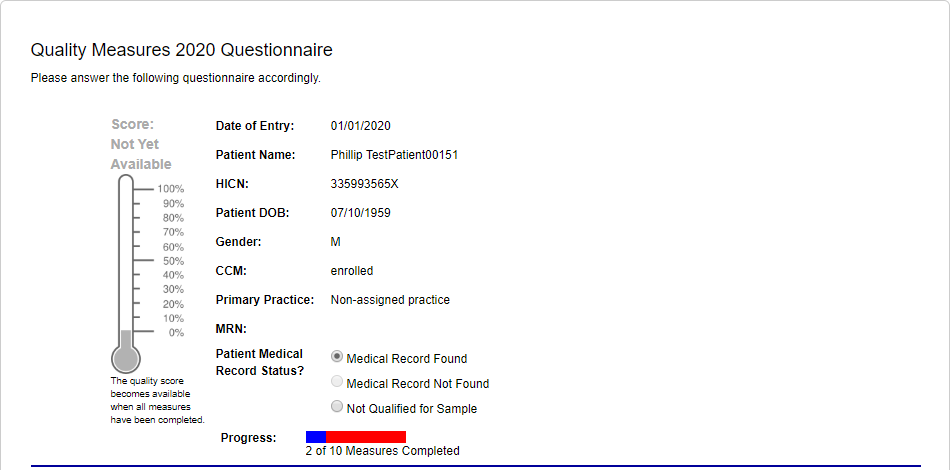
- At the top of the questionnaire page, the patient’s basic information is displayed. The patient’s Medical Record Status is directly below these measures. At the bottom is a colored bar indicating the patient’s Progress through the assigned measures. Once all of the patient’s measures have been completed, the bar to the left will indicate the patient’s Quality Score.
- Each questionnaire also has one of three possible selections for Patient Medical Record Status and four additional selections if the final option of the three is chosen. If the patient is Not Qualified for Sample, a reason must be selected, and the date the patient became not qualified must be inserted.
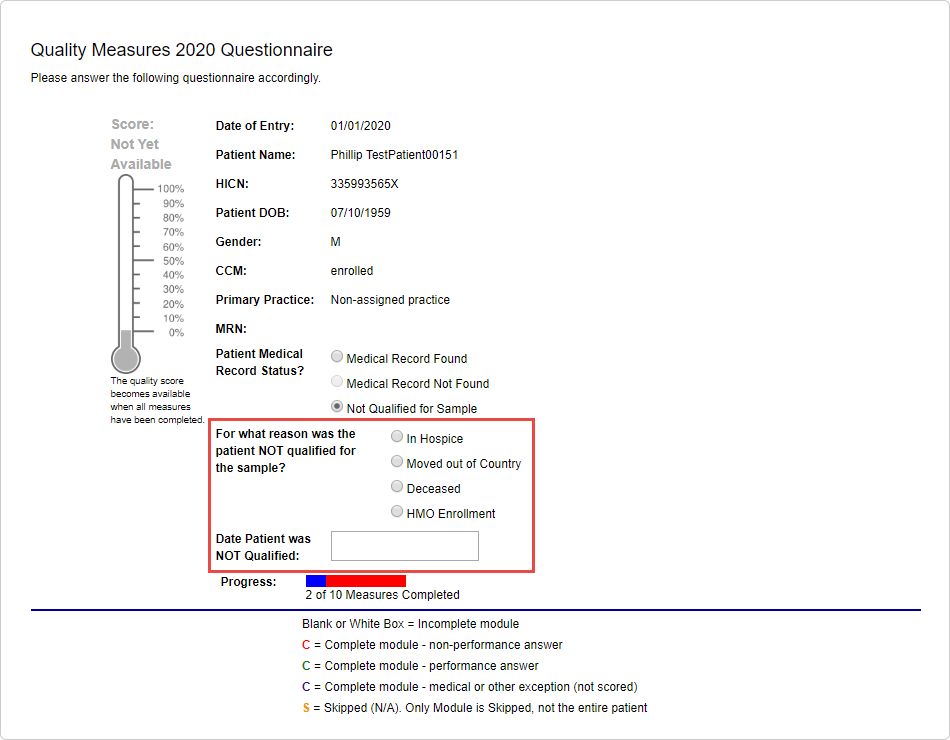
Medical Record Status Responses:
Medical Record Found – Patient’s medical record exists in the system
Medical Record Not Found – Patient’s medical record does not exist in the system. This option is used rarely during GPRO when the patient's medical record cannot be found.
Not Qualified for Sample – Patient is not eligible for due to one of several unique circumstances during the reporting period
Reasons a Patient May Not Qualify:In Hospice – Patient entered hospice care during the year
Moved out of Country – Patient left the country during the year
Deceased – Patient passed away during the year
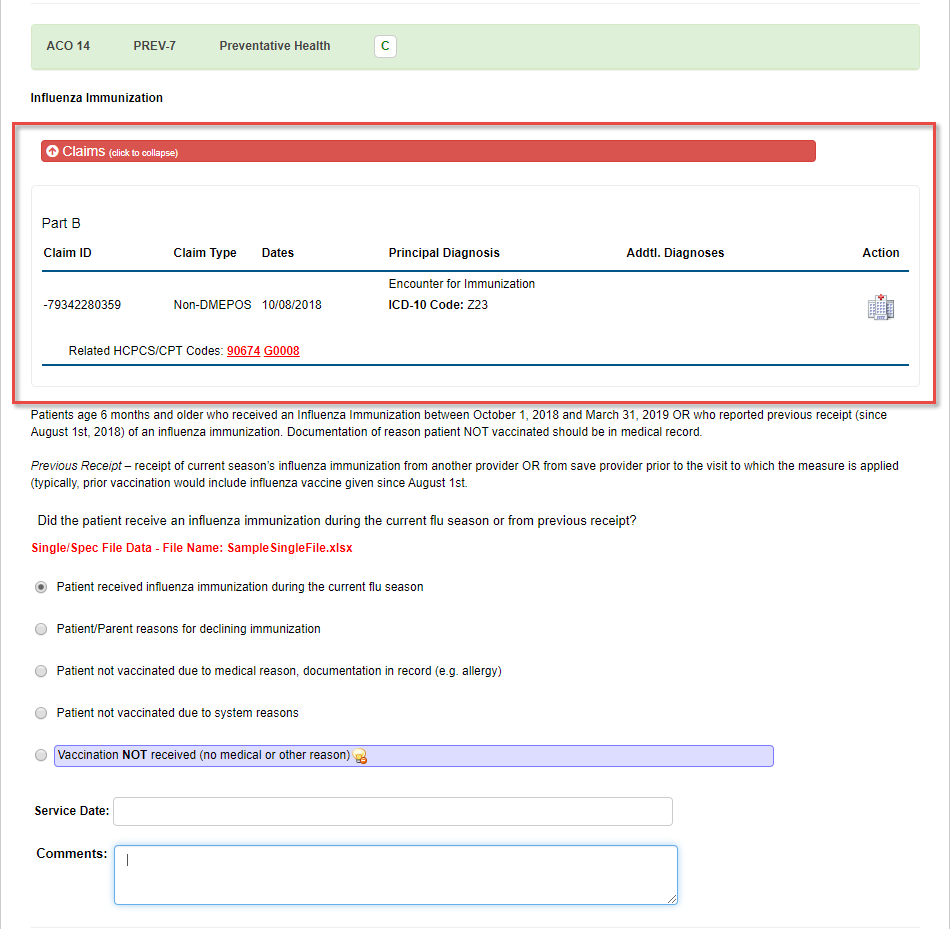
HMO Enrollment – Patient left Medicare and was entered into an Health Enrollment Organization - Each quality measure for the patient is outlined further down on the page. For each measure, if data already exists, then the date and form of the data submission is shown in red font. In addition, the option to manually key the data is available, whether prior data for the measure exists or not.
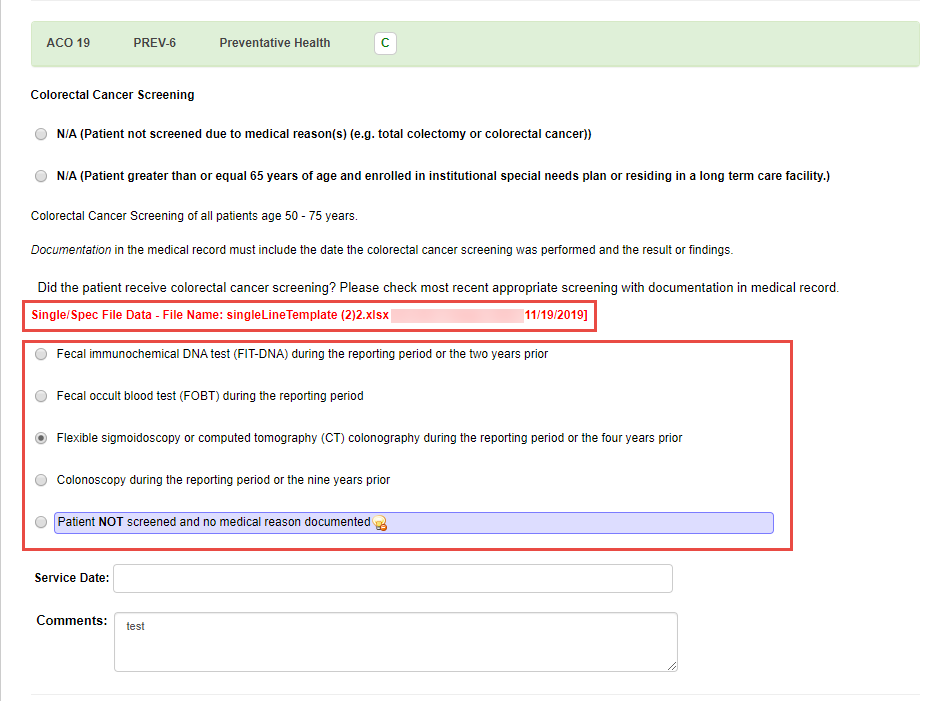
For every measure, there is a response highlighted in Purple. This is considered a non-performance response.
- Depending on the patient, some measures may contain associated claims data, also known as 'CCLF Data'. A summary of each claim is listed within the measure itself, with the ability to click the icon under the 'Action' column for full details.
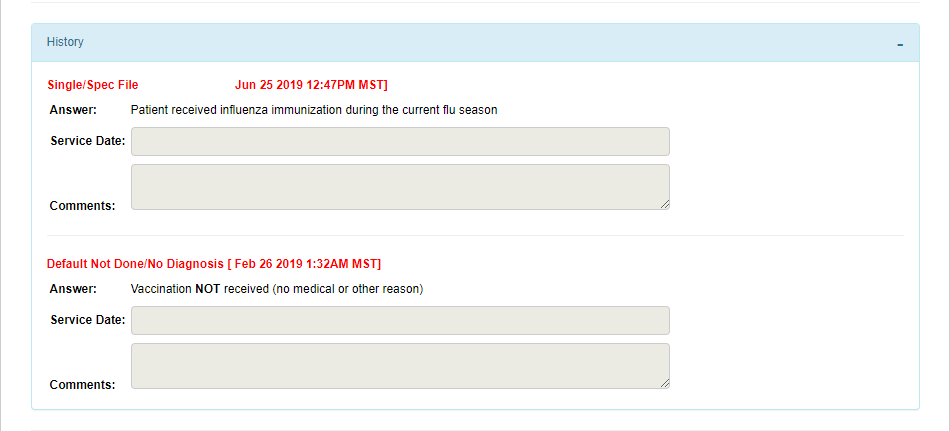
- Some measures may also contain historical data if the patient's response data has been saved more than once. Under the 'History' tab you may find previous service dates and comments for specific quality measures.
- Once the patient’s measures have all been completed, an individual quality score is available at the top of the questionnaire page. This shows the patient’s overall score after calculating all ranked measures.
